Feed Management AI Application — User Guide
This document offers a comprehensive overview of the Feed Management AI Application, detailing its components and providing a step-by-step guide on how to effectively use the application.
I. Feed Management AI Application
1.1 About The Feed Management AI Application
The Feed Management Tool utilises generative AI to enhance product descriptions, create titles, define key selling points, and summarise product reviews, tailoring the product feed for shopping advertisements. Users can upload a brand's Tone of Voice to ensure that the outputs align with their specific style and guidelines. The tool also includes features for cleaning product attributes and filling in missing data.
Additionally, users can set up A/B tests to compare the performance of products with enhanced information against those without modifications.
It supports bulk processing by allowing large file uploads, enabling the generation of outputs for numerous products simultaneously. Generated results are stored within the tool and can be retrieved for future use as needed.
Product data can be provided either by uploading a CSV file or by connecting directly to Google Merchant Center.
1.2 Logging Into The Application
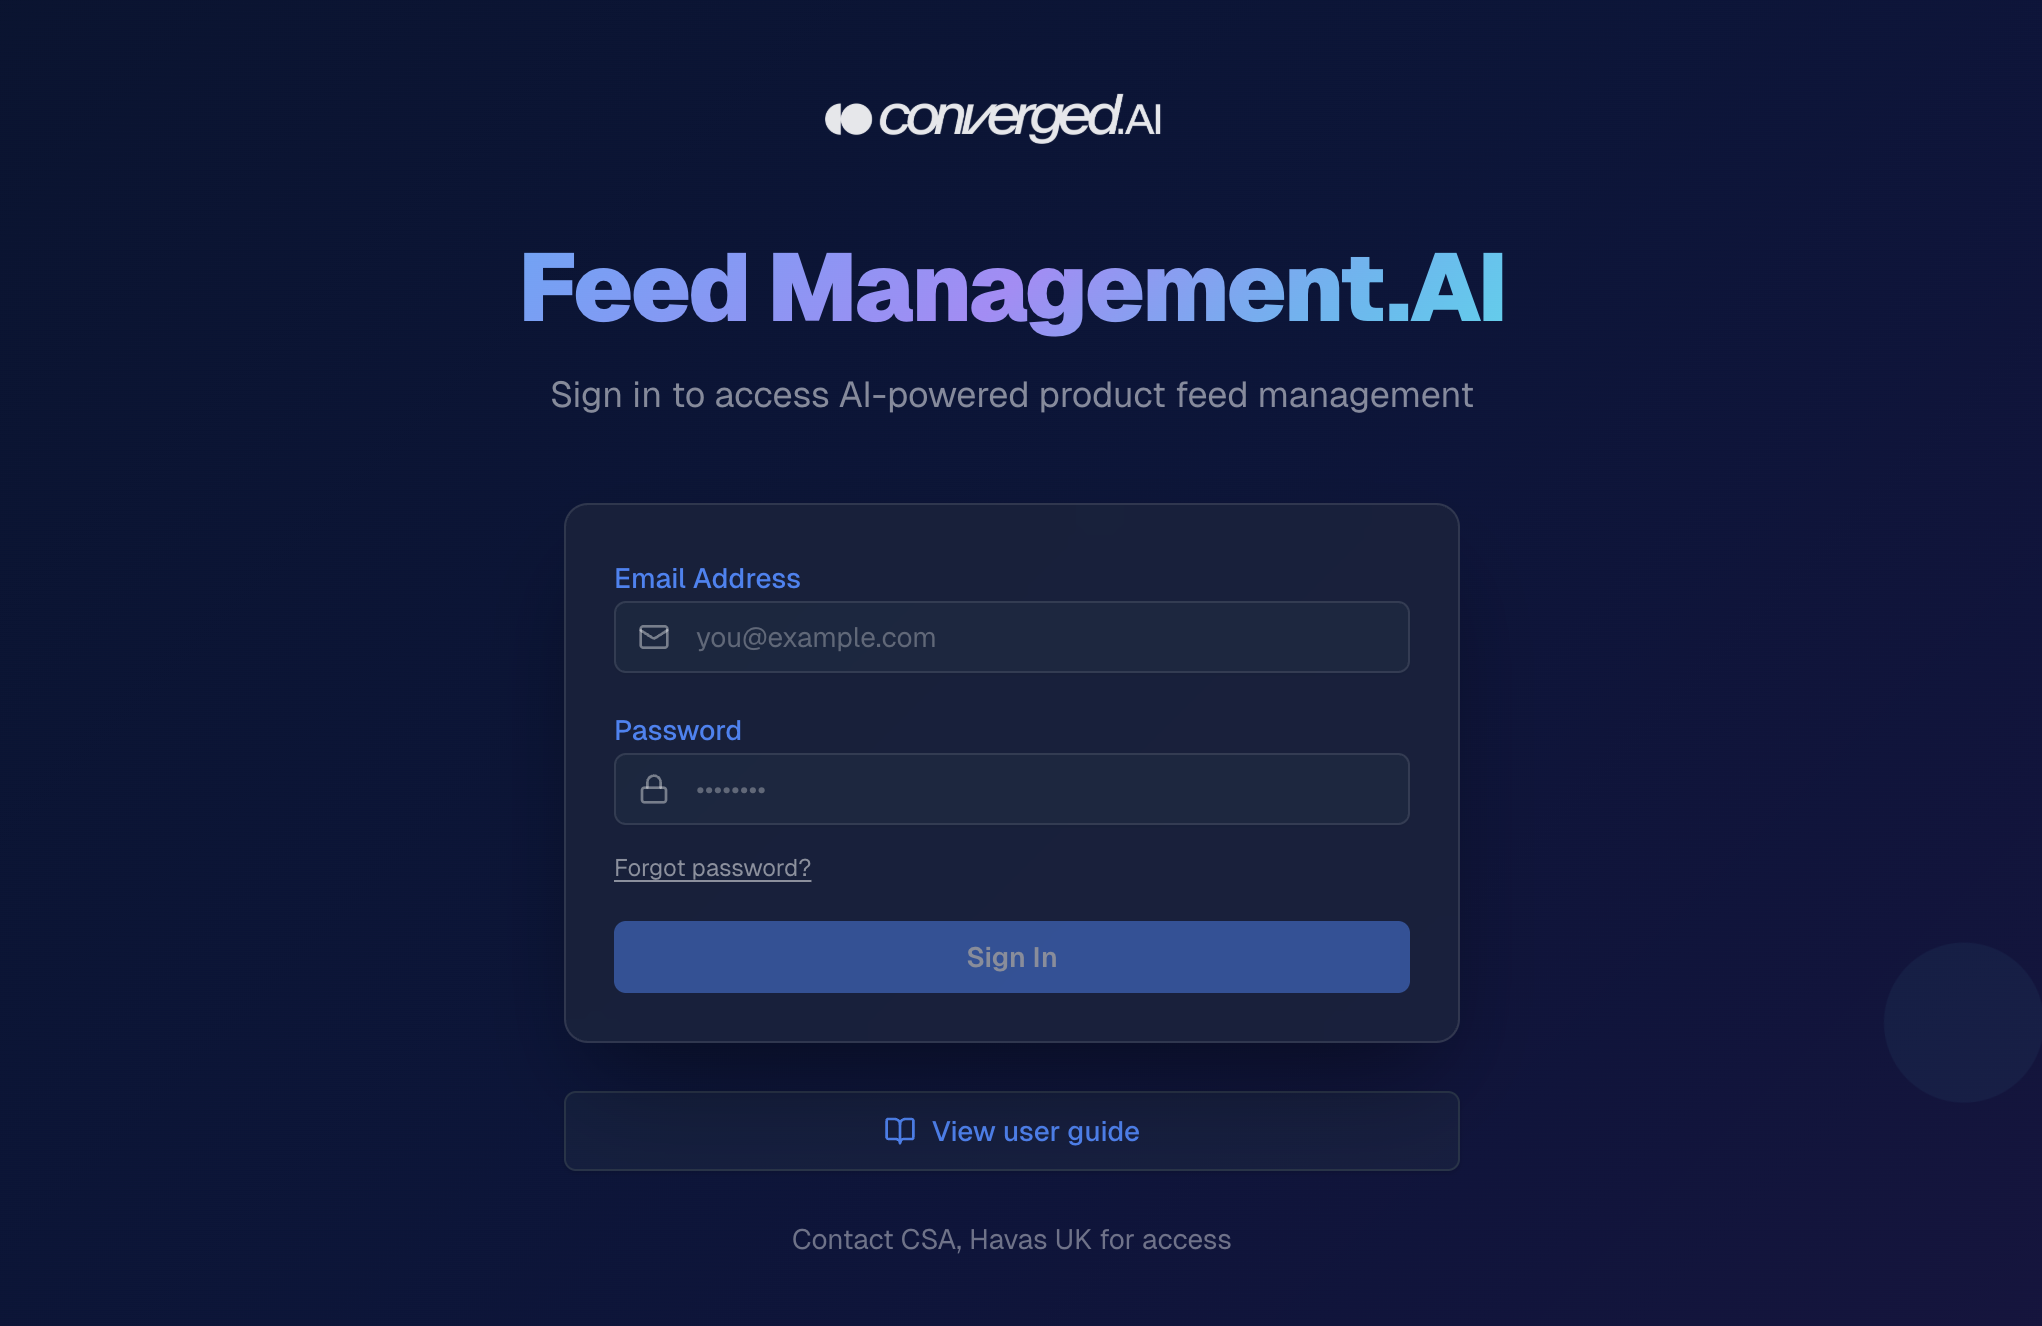
Figure: Email and password fields, Sign In, and Forgot password? on the homepage.
To access the tool, log in directly from the homepage by entering your email address and password, then click Sign In.
If you have forgotten your password, click the Forgot Password link below the sign-in button. Enter your email address and a password reset link will be sent to your inbox.
A View User Guide button is displayed below the login card and can be used to access this guide without signing in. This link is also available in the navbar.
Note: Your access to specific clients and countries is controlled by the user group assigned to your account. Contact your administrator if you require access to additional clients or countries. If you need an account, contact your administrator.
If your account belongs to more than one group, a Select Group dialog will appear immediately after sign-in, prompting you to choose your active group. If you only have access to one group it will be selected automatically and the dialog will not appear. You can switch groups at any time from the user menu in the top-right corner.
1.3 Navigating Through The Application
The navigation bar at the top of the application allows users to access the various features.

Figure: Main navigation bar. The user menu (initials, top-right) opens account details and group switching.
- Home: Clicking the logo will redirect you to the application's homepage.
- Generate Text: This tab provides access to the tool's text generation feature, enabling users to generate titles, descriptions, key selling points (KSPs), product types, and product categories from uploaded data.
- Attribute Cleansing: This tab offers access to the attribute cleansing feature, which streamlines the cleansing or filling of specific product attributes.
- Review Summarisation: This tab provides access to the review summarisation feature, enabling users to summarise product reviews, extract highlights and lowlights, and analyse sentiment.
- Load Results: The Load Results page allows you to search for and download processed output files from previous submissions using a filter panel.
- User Guide: Opens this user guide.
User menu (avatar, top-right): Click your initials button to open the user dropdown, which displays your name, email, and role. If your account belongs to multiple groups, a Switch Group option will appear, allowing you to change your active group and the client access associated with it.
II. Generate Text
2.1 About Text Generation Feature
This page provides a powerful feature to streamline content creation for your products. By providing product data — either by uploading a CSV file containing your Product Information Management (PIM) data or by connecting to Google Merchant Center — you can automatically generate compelling product descriptions, optimised titles, key selling points (KSP), product types, and product categories. These outputs are generated with the help of Google's powerful Large Language Model (LLM), Gemini, ensuring state-of-the-art content quality and relevance.
Text generation tasks can optionally be configured with demographic targeting (age, gender, family status, employment status, and income group) to tailor the generated content to a specific audience.
This functionality is ideal for creating marketing materials, populating e-commerce listings, or improving overall product presentation.
2.2 Uploading Data
This section provides a detailed guide on how to provide your product data to the application. Two data source options are available, selectable via tabs on the data source card.
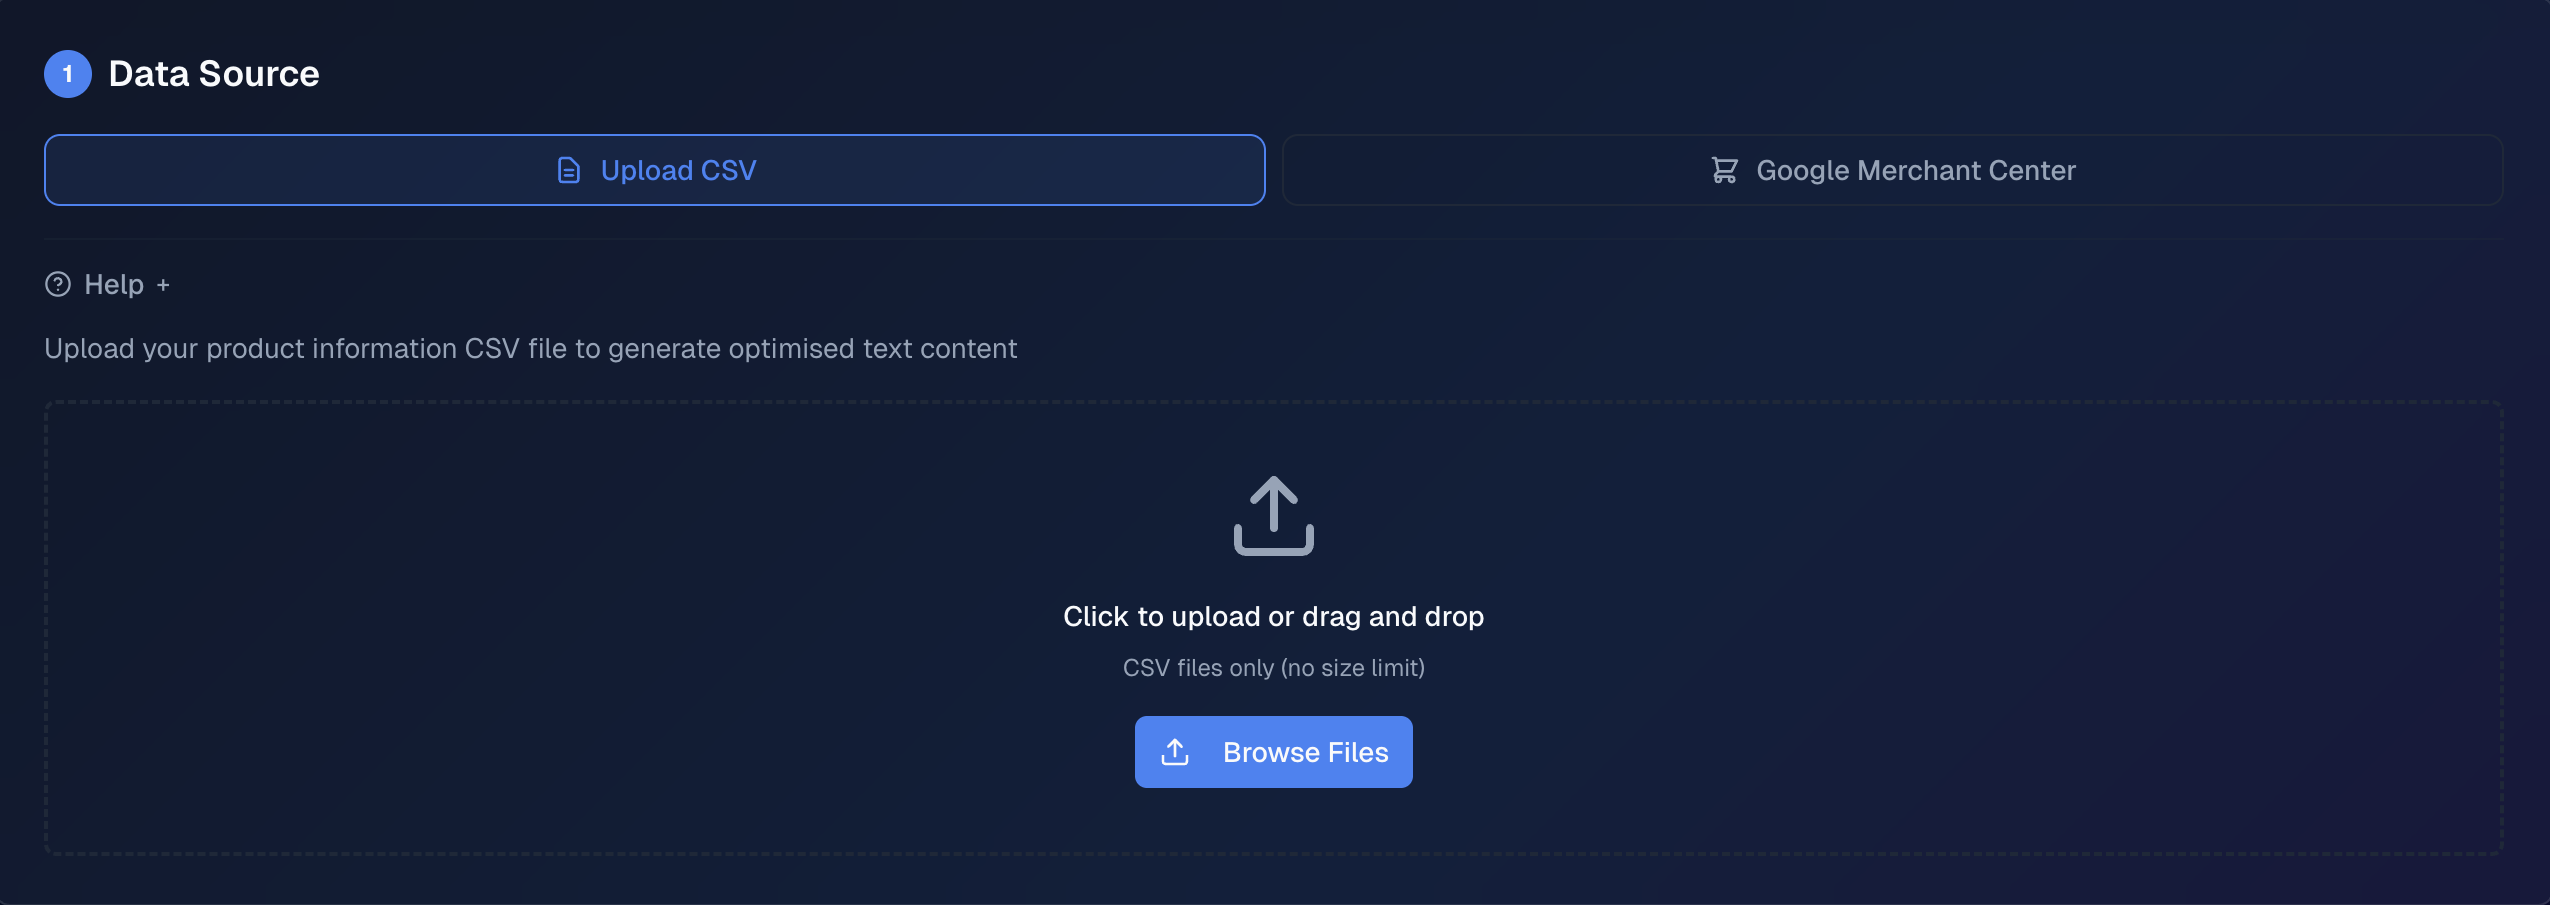
Figure: Data source step — choose Upload CSV or Google Merchant Center.
1. Upload CSV Tab
Upload a CSV file containing your PIM data. The file must be in CSV (comma-separated values) format. The first row should contain the column headers. Which columns you need depends on your selected outputs: for example, the Description output requires you to choose which column contains product descriptions when you configure LLM parameters; other outputs use the attribute columns you select there. If you wish to perform A/B tests, a product ID column is also required.
2. Google Merchant Center Tab
Select a client, apply product filters, and fetch data directly from your Google Merchant Center account. No CSV upload is required. See Section 2.3 for a full step-by-step guide.
3. Help Dropdown
A help section is available on the Upload CSV tab, providing the necessary information to correctly upload the file in the required format. It also includes a sample data structure.
4. Upload File / Browse
You can upload the file by either dragging and dropping it into the upload area or by clicking the Browse files button to select the file.
Once the file has been uploaded and validated, the following are available:
- Column Statistics — an expandable section that shows, for each column, distinct value count, missing count, and duplicate count, plus the total row count when validation completes.
- Data Preview — an expandable table preview limited to the first 50 rows of your uploaded file, allowing you to verify that the data has been read correctly before proceeding.
2.3 Google Merchant Center
The Google Merchant Center tab allows you to pull product data directly from your GMC account without uploading a CSV. This is available as an alternative data source on the Generate Text page.
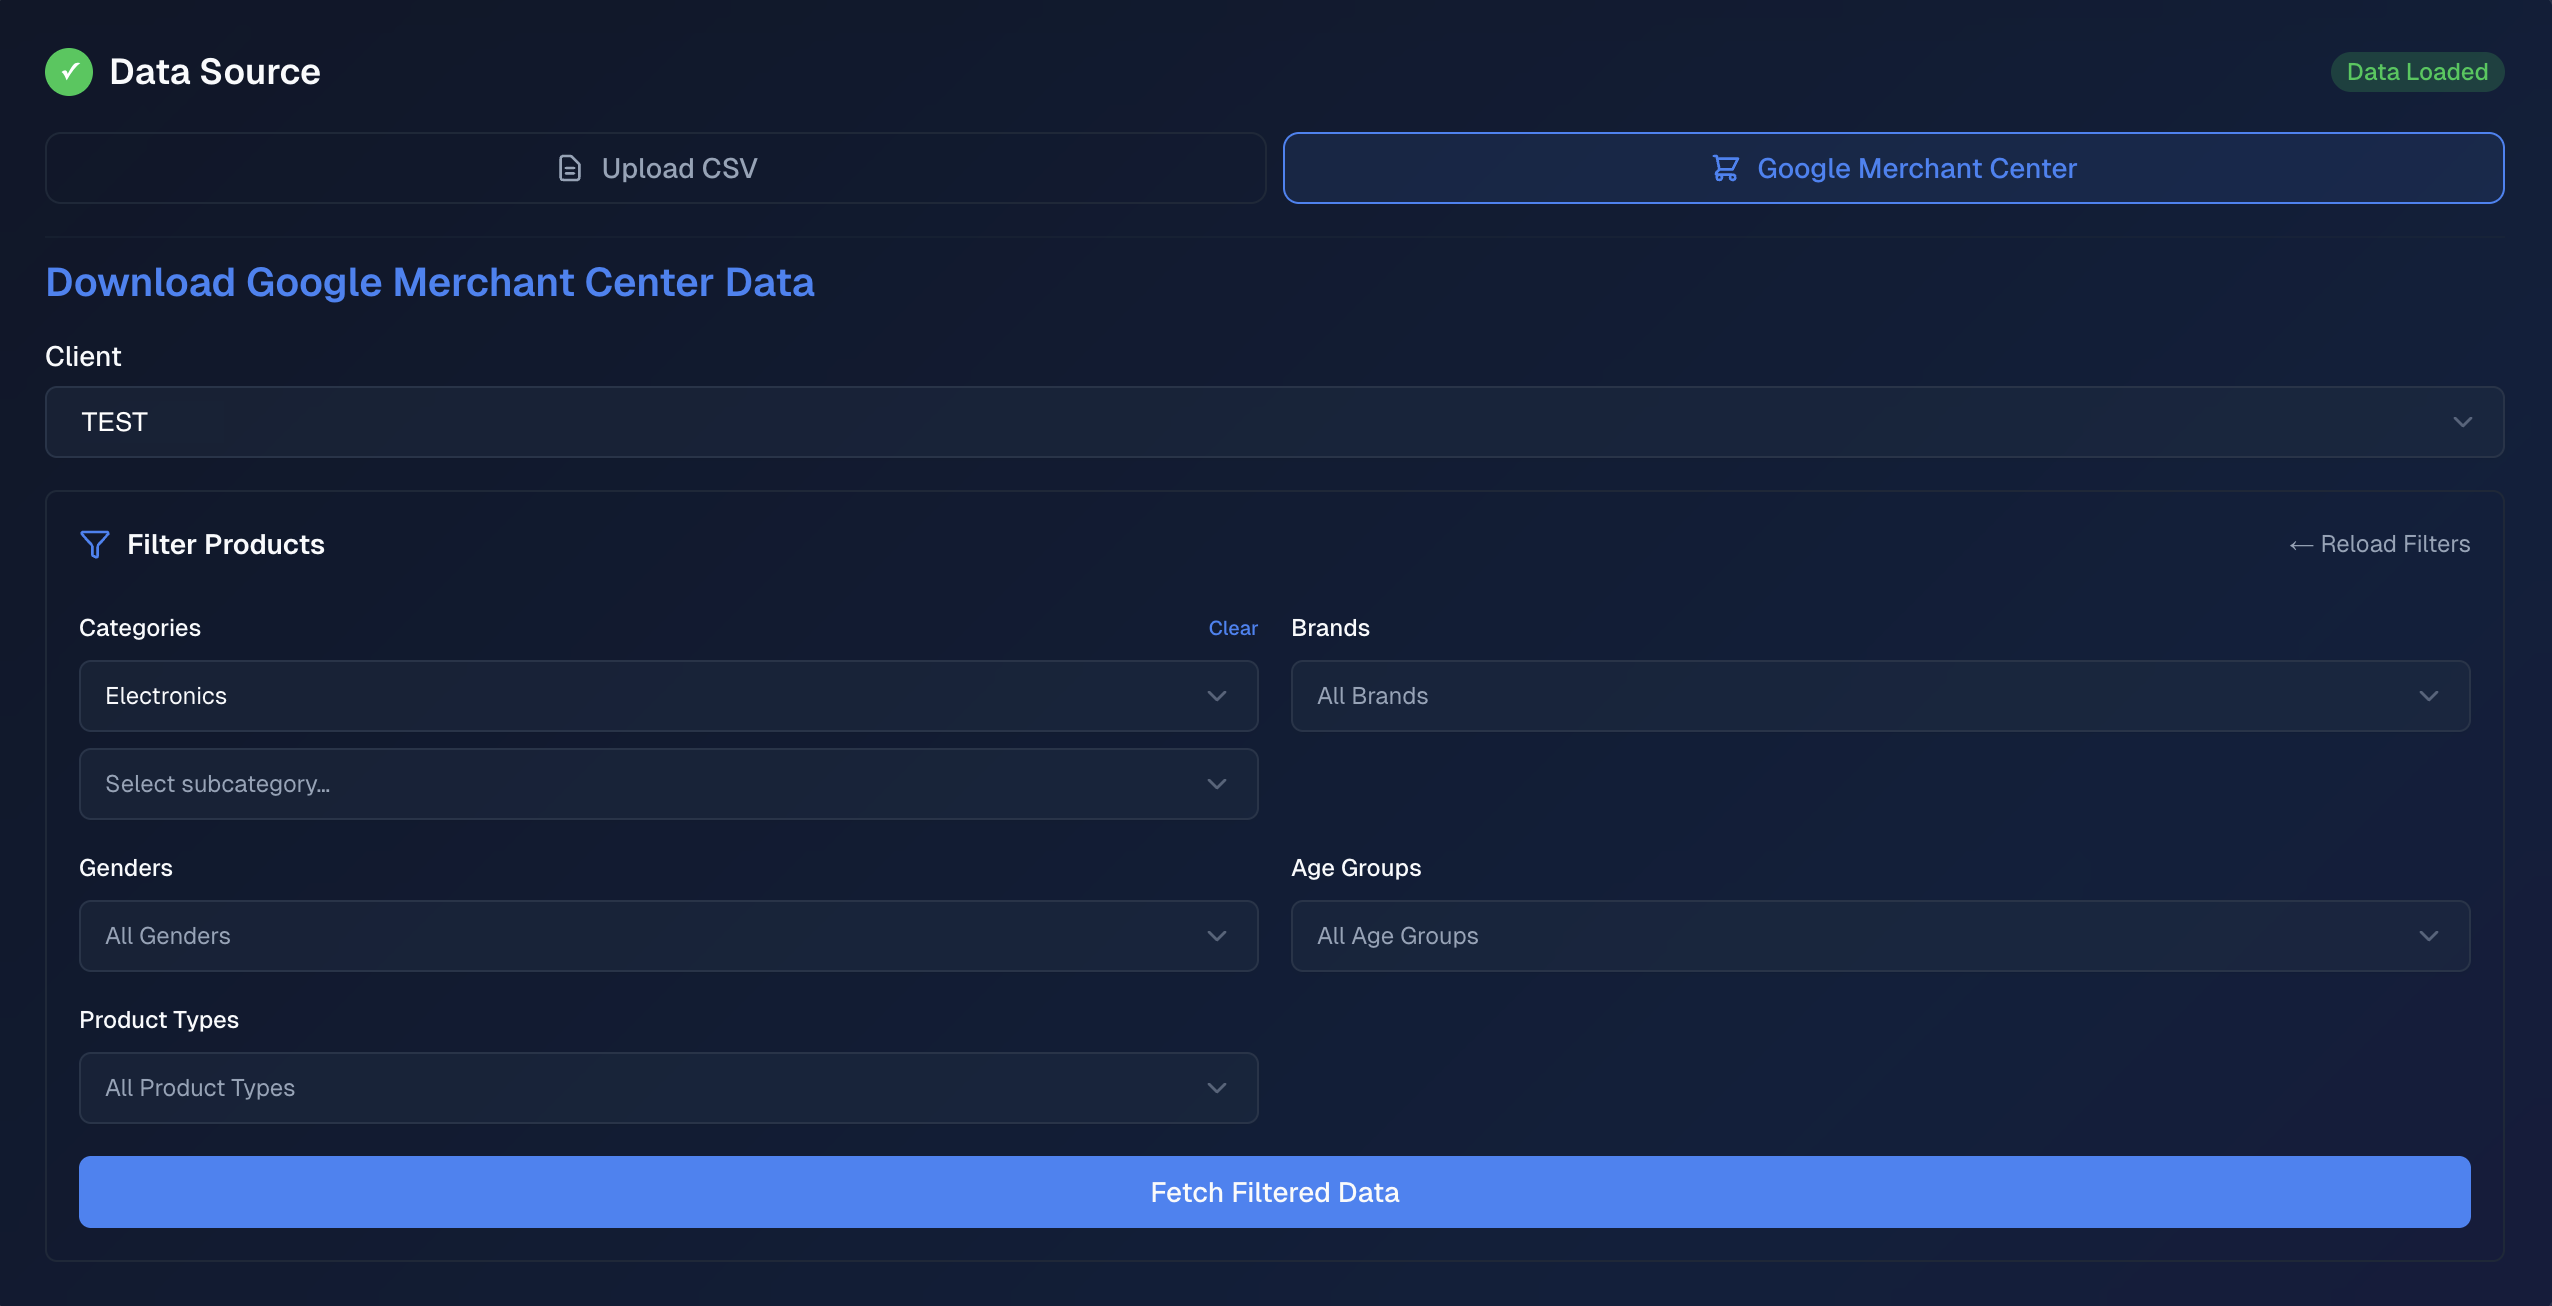
Figure: Google Merchant Center tab — select client, load filters, apply selections, and fetch data.
1. Select Client
Choose the relevant client from the dropdown. Once selected, the Load Product Filters button will appear.
2. Load Product Filters
Click Load Product Filters to fetch the available filter options from the backend. This may take a moment. Once complete, a Filter Products panel will appear.
3. Filter Products
Apply filters using the cascading dropdowns (e.g. brand, category). Each filter can have subcategory levels that appear after a top-level selection — subcategory selections are optional. At least one top-level filter must be set before data can be fetched. To reset, click ← Reload Filters.
4. Fetch Filtered Data
Click Fetch Filtered Data to retrieve products matching your selected filters. The number of matching products will be displayed.
5. Data Preview
A scrollable table displays the first 50 rows of the fetched dataset, allowing you to verify the data before proceeding.
6. Use Data for Generation
Click Use Data for Generation to load the fetched dataset into the text generation workflow. No CSV upload is required when using this option.
2.4 Parameter Selection
Selecting the right parameters is crucial for generating the desired output from the text generation feature. These parameters guide the LLM in producing the most relevant and accurate content.
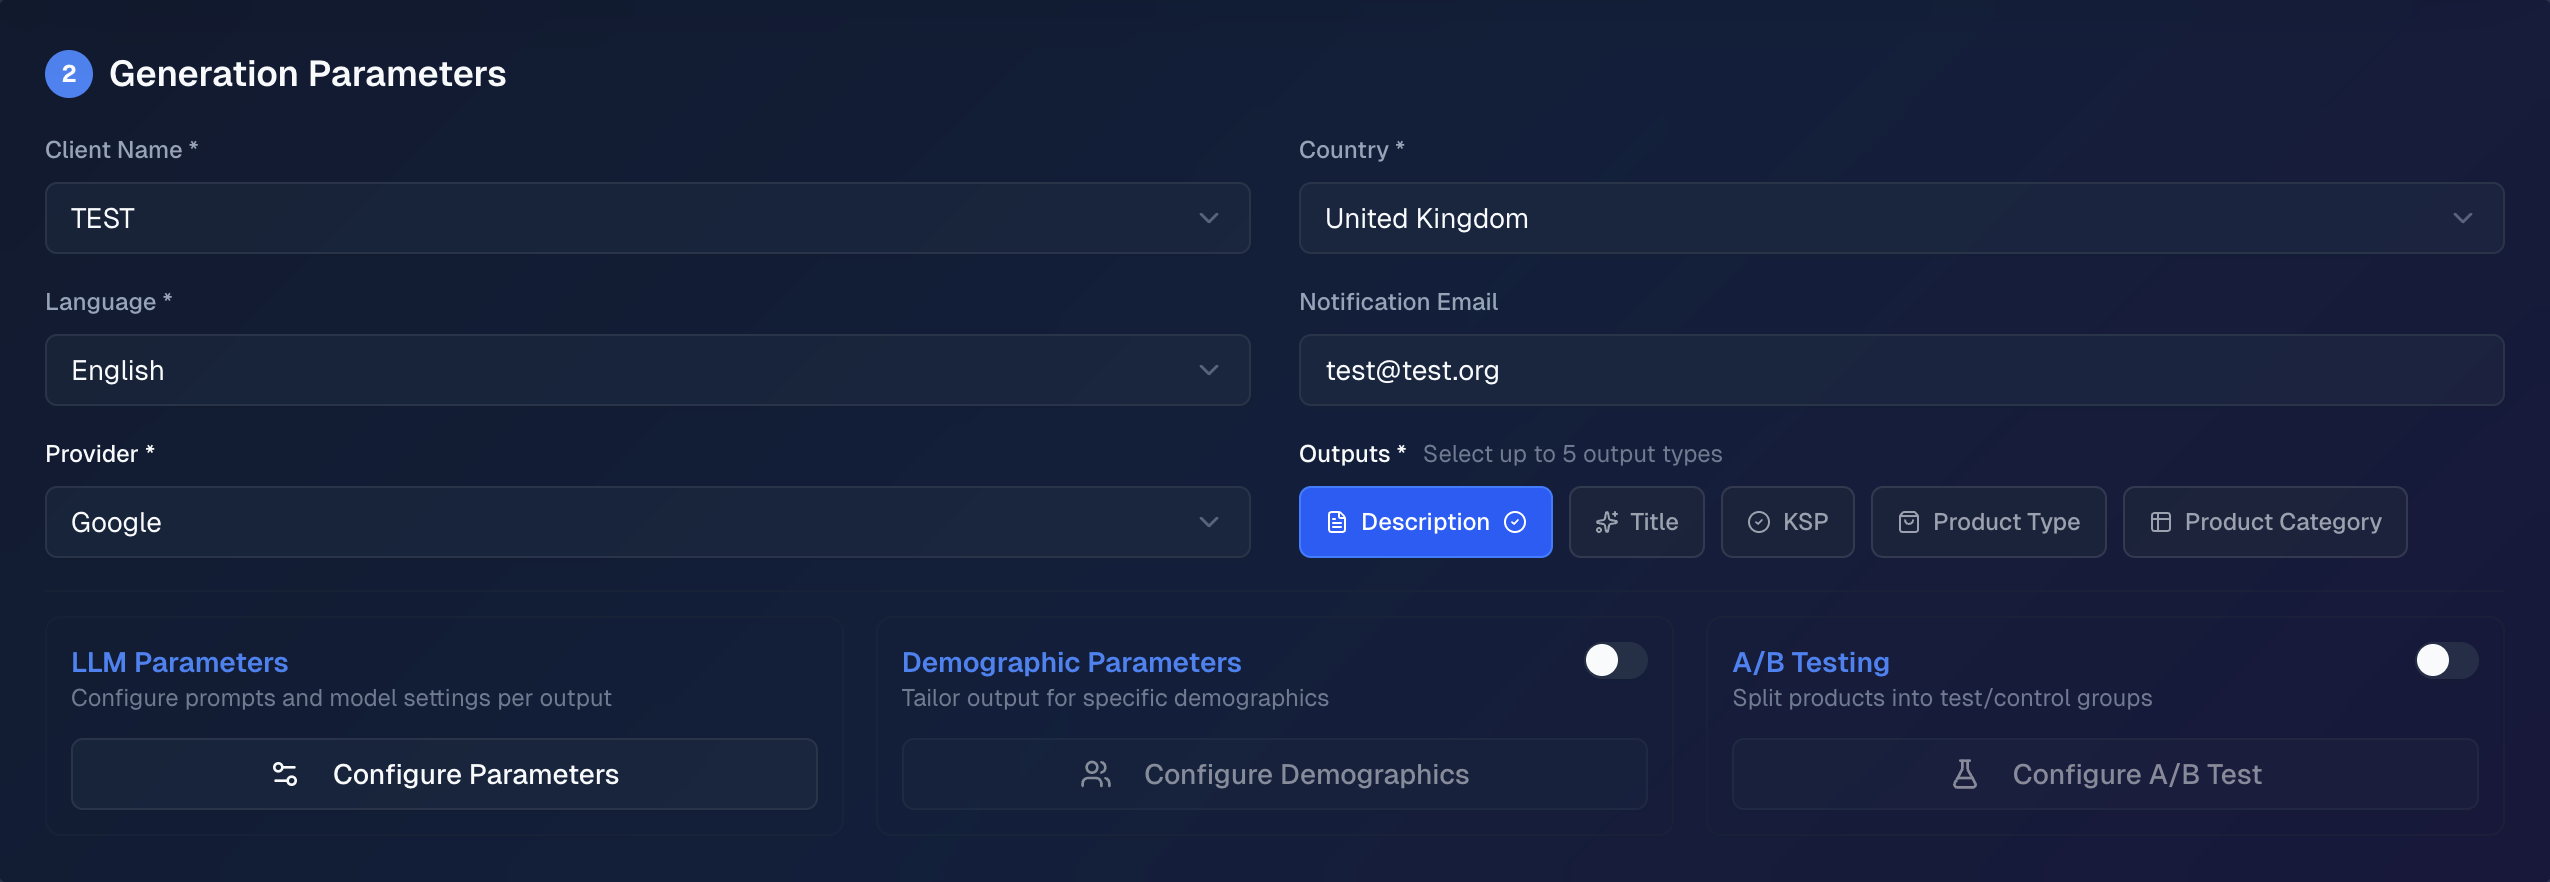
Figure: Parameter selection — client, country, language, notification email, provider, output, LLM parameters, and demographics / A/B Test toggles.
1. Client
Adding the client's name helps the LLM to better tailor its responses, ensuring the generated content is more aligned with the client's specific product or brand.
2. Country
Select the target country for the output to tailor the generated content to align with the specific market.
3. Language
Select the desired language for the output. The available languages are drawn from the application's configuration.
4. Notification Email
Enter the email address where a completion notification should be sent once the task has been processed.
5. Provider
The destination platform where the products will be listed. Currently supports Google Merchant Center.
6. Outputs
Select one or more outputs to generate. Available options are:
- Description — detailed product description
- Title — optimised product title
- KSP — key selling points
- Product Type — product type classification
- Product Category — product category classification
7. Product ID Column (when continuing from Review Summarisation only)
This field appears only when you reach Generate Text via passthrough from Review Summarisation. Select which column in your uploaded product data contains the product identifier so it matches the product IDs from your review task.
8. LLM Parameters
Click Configure Parameters to open the LLM parameter modal and fine-tune the model's behaviour. See Section 2.5 for details.
9. Demographics Toggle
Enable this toggle to open the demographics modal, where you can specify the target audience (age range, gender, family status, employment status, income group) and any seasonal events to incorporate into the generated content.
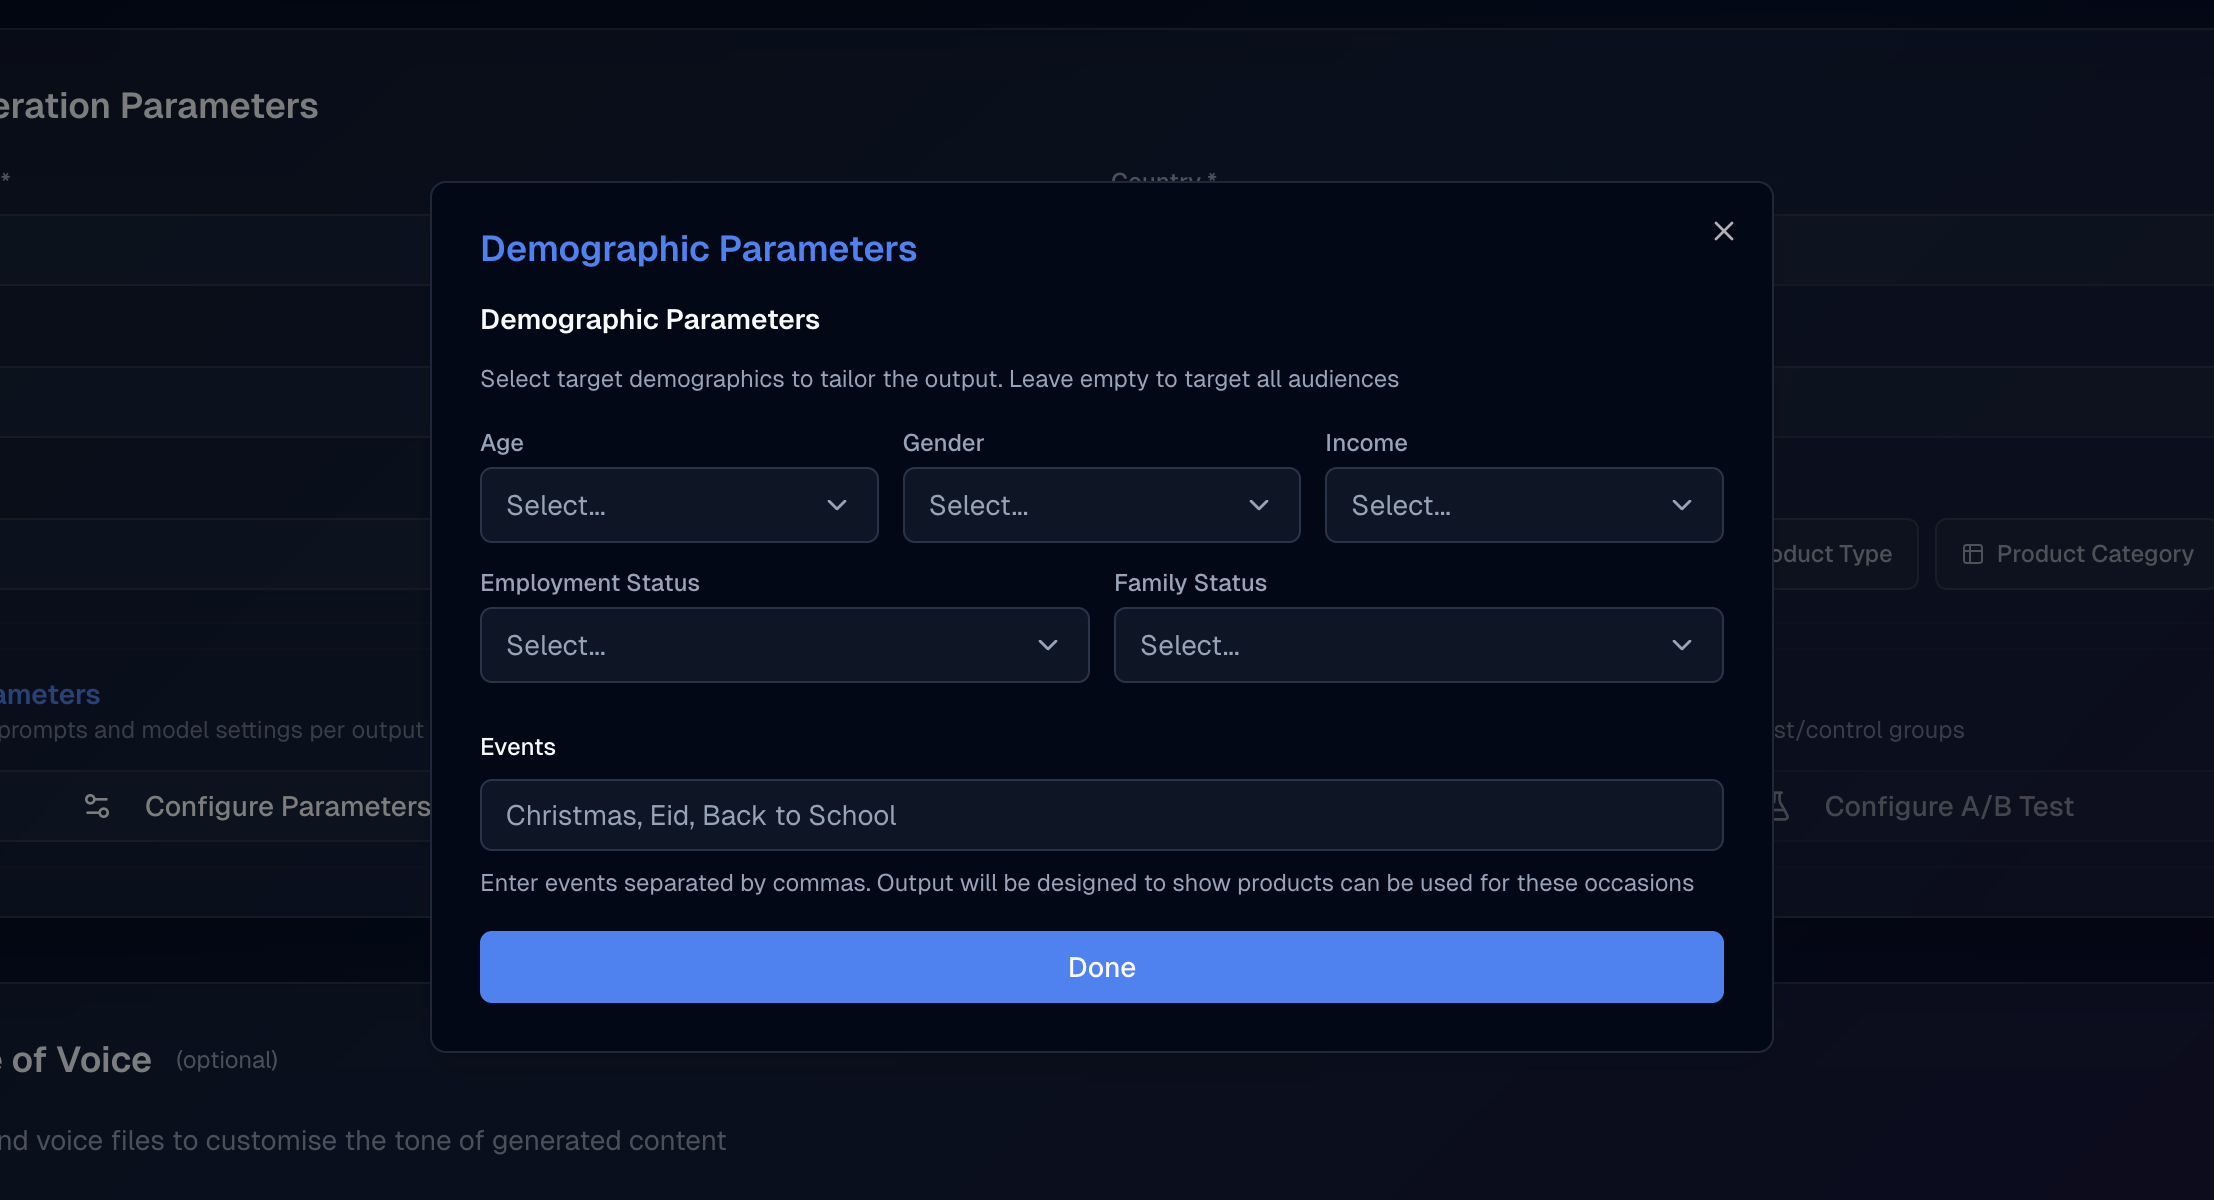
Figure: Demographics modal — audience targeting and seasonal events.
10. A/B Test Toggle
Enable this toggle to configure an A/B test for this task. Clicking the toggle opens the A/B test modal where you upload historical performance data and select test parameters. See Section IV for a full description.
2.5 LLM Parameter Selection
After selecting the general parameters, you can configure the LLM parameters by clicking Configure Parameters. This opens a modal dialog. Configuring many of these parameters is optional but allows you to fine-tune the model's behaviour to better match your specific requirements.
The modal contains a tab for each output you have selected (e.g. Description, Title, KSP). Each tab has the following fields:
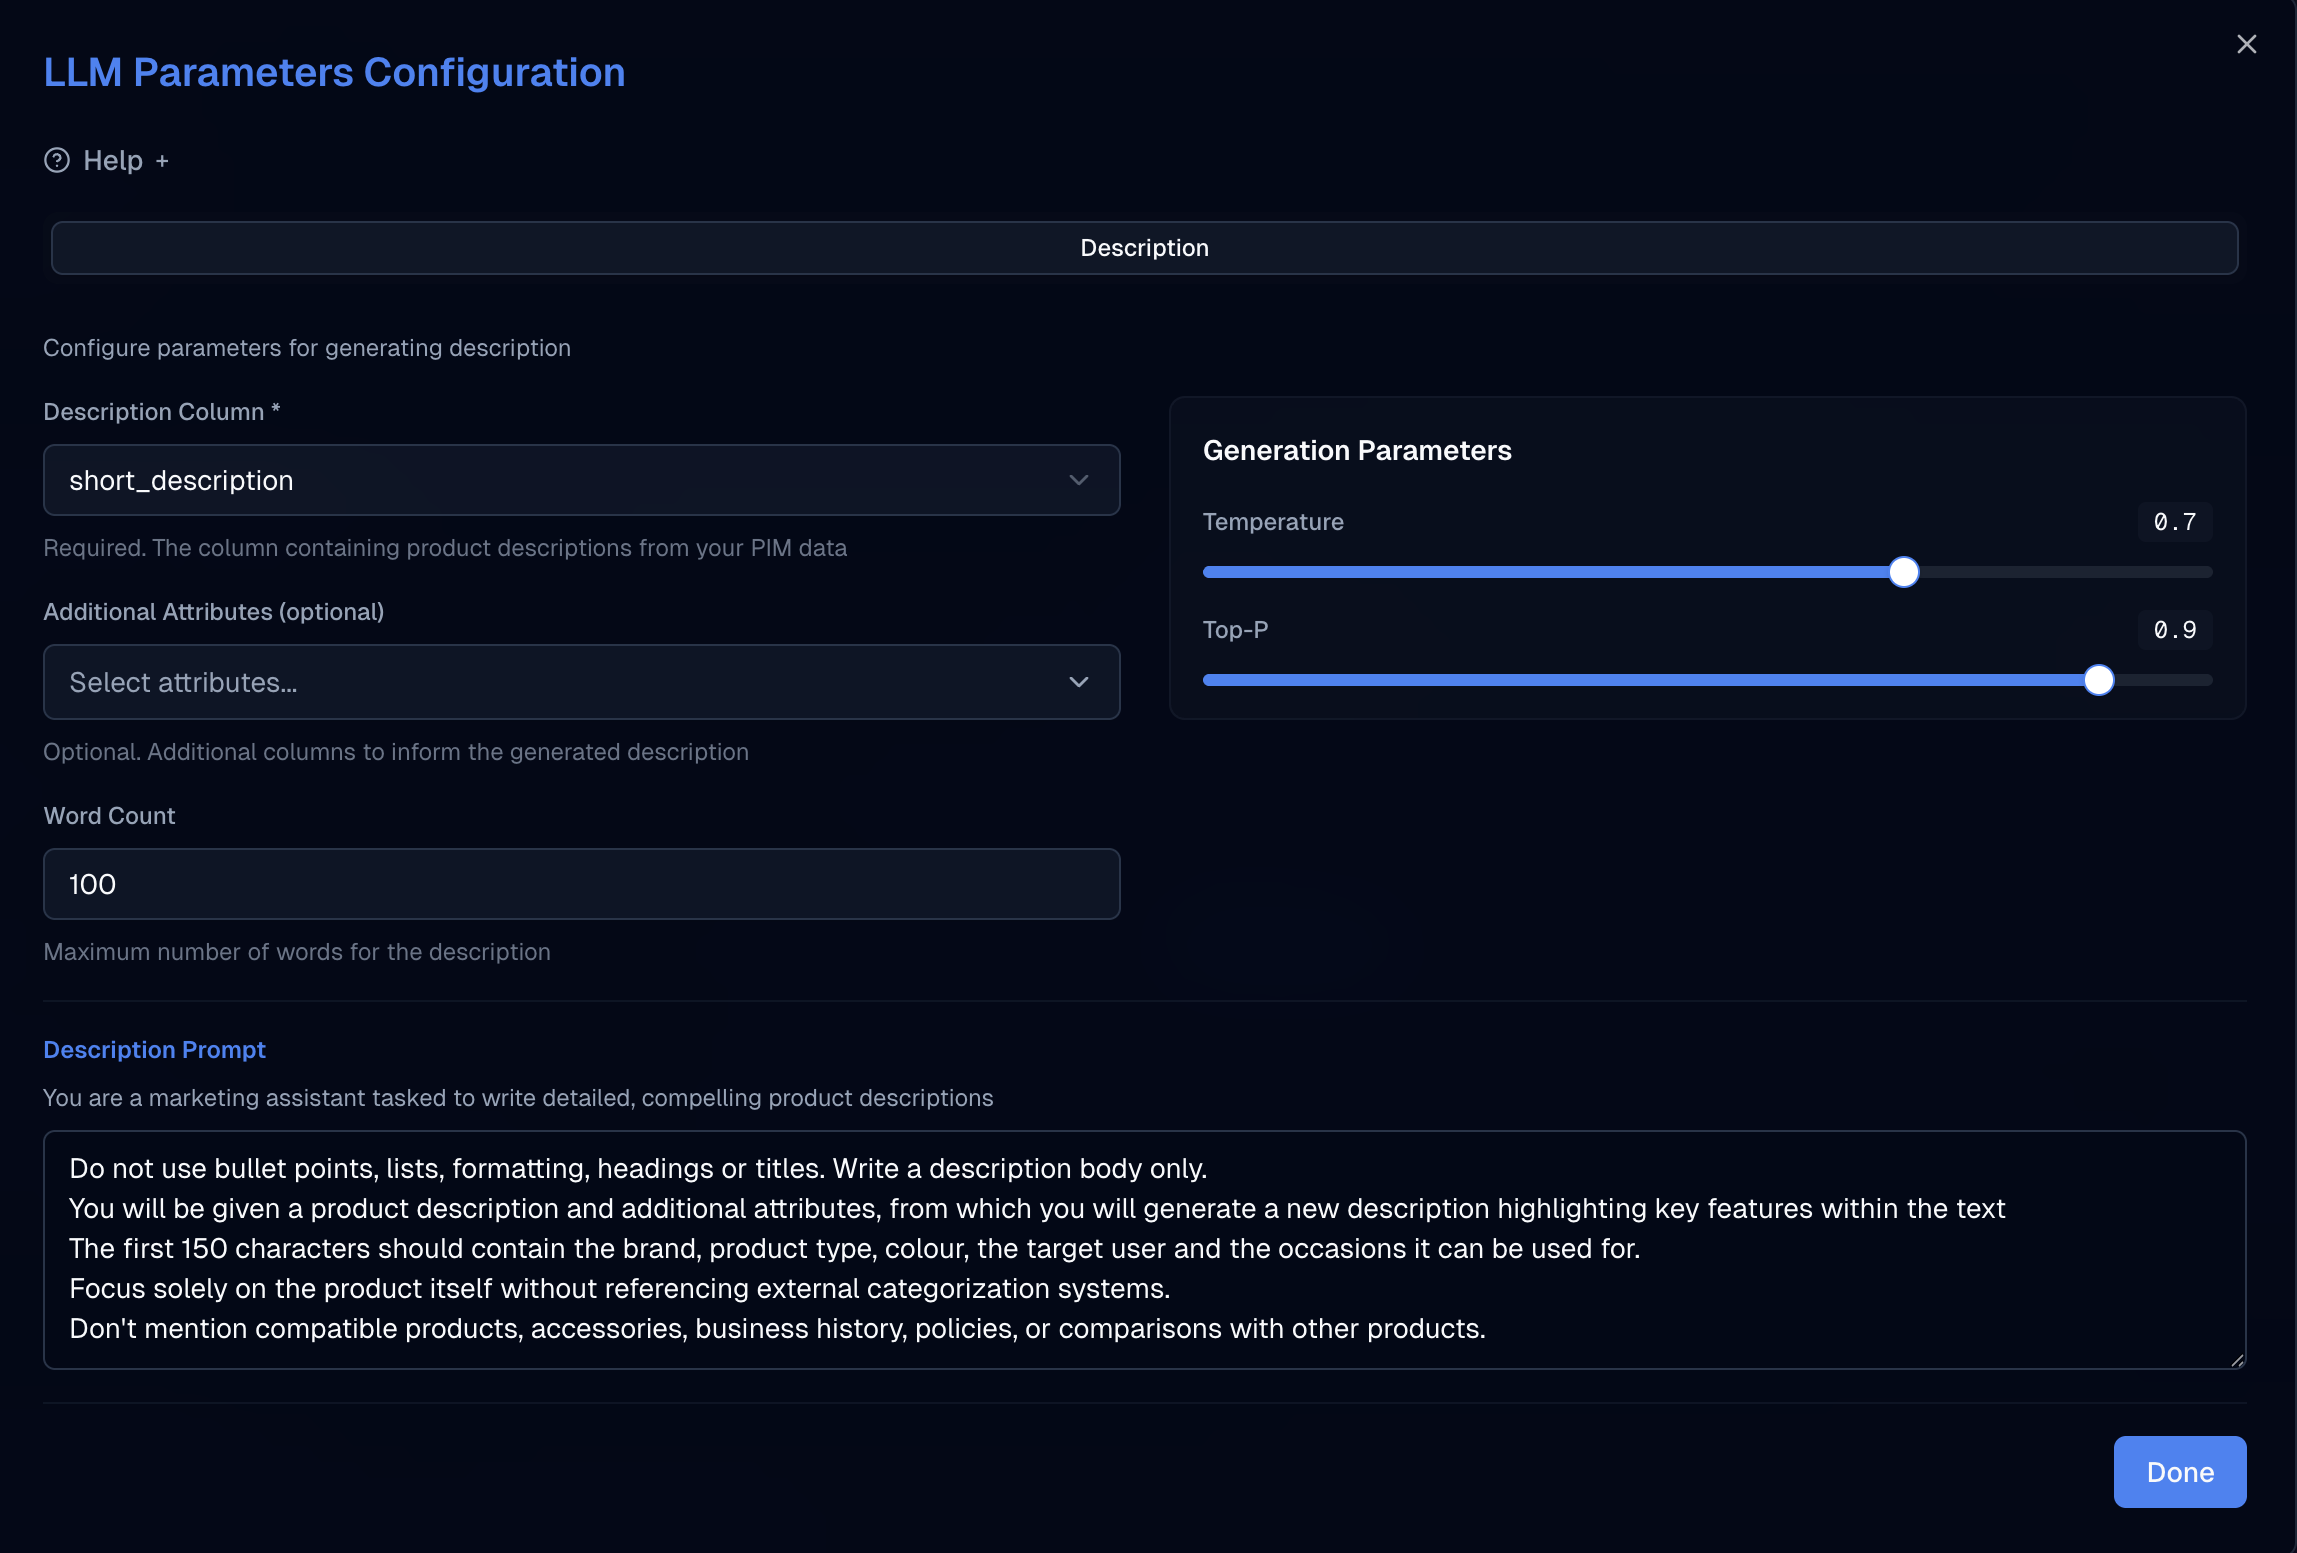
Figure: LLM parameters modal — one tab per selected output.
1. Help
A help section is available at the top of the modal, providing explanations of each parameter.
2. Description Column (Description output only)
Select the column from your data that contains the original product description to be enhanced. This ensures the tool applies enhancements to the correct data. Not required for Title, KSP, Product Type, or Product Category.
3. Additional Attributes
Select one or more columns from your data to assist the model in generating more accurate and contextually relevant output. For Title, KSP, Product Type, and Product Category outputs, at least one attribute must be selected. For Description outputs, attributes are optional.
4. Word Count
Specify the approximate number of words to generate. Serves as a guideline rather than a strict limit. Not required for Product Category.
5. Temperature
Controls creativity (0–1). A lower value produces less creative, more predictable output; a higher value produces more creative but potentially unconventional output.
6. Top-P
Controls word-choice probability (0–1). Lower values restrict the model's word choices to the most probable options, producing more conservative output.
7. Prompt Customisation
The first line of the prompt is fixed and cannot be altered. The editable section allows you to tailor the prompt to your specific requirements.
8. Product Type Hierarchy (Product Type output only)
Optionally upload a file defining your product type hierarchy. The model will use this to assign product types from your predefined taxonomy rather than generating free-form values.
Parameters 3–7 repeat for each output tab. This allows you to customise the settings for every individual output independently.
2.6 Tone of Voice
After uploading your data and configuring parameters, a separate Tone of Voice step card appears.
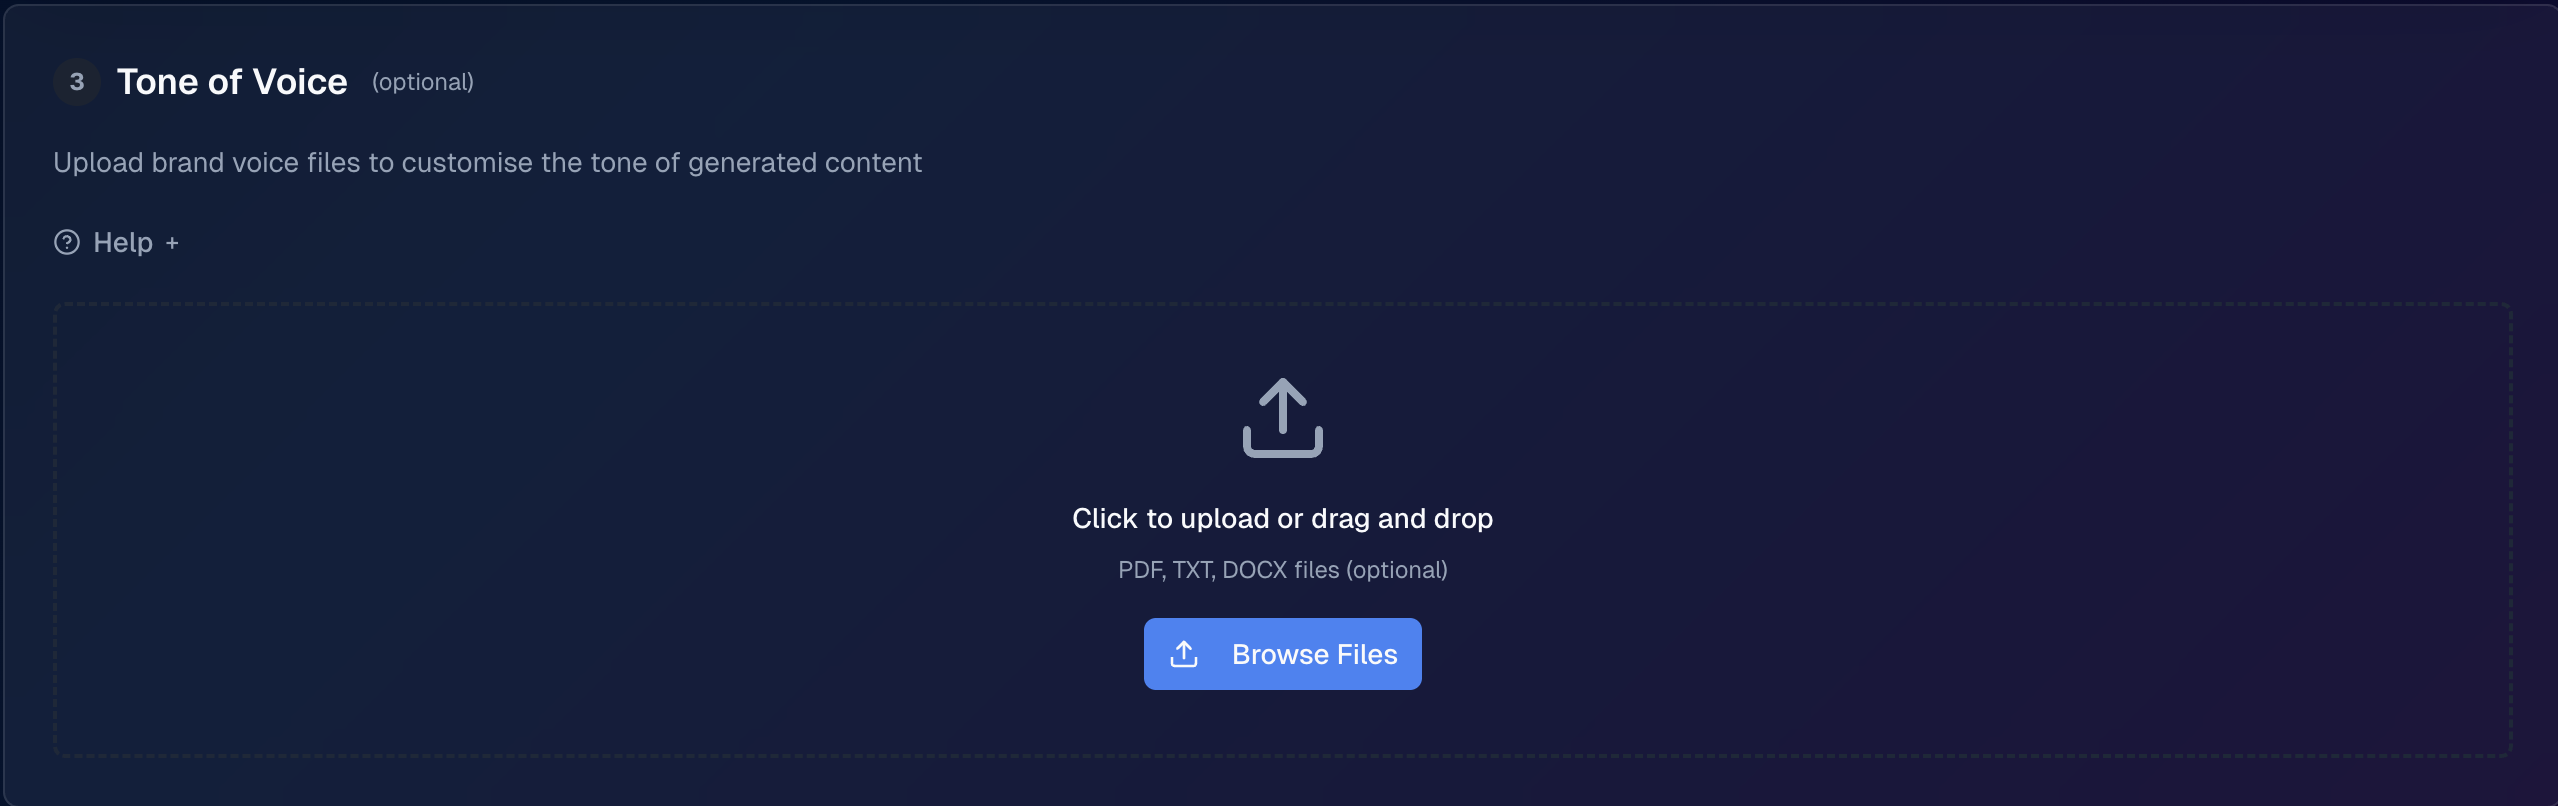
Figure: Optional Tone of Voice step — upload brand voice files.
Upload one or more brand voice files (PDF, TXT, DOCX, or DOC) to customise the tone of the generated content. Gemini will analyse each file and apply a unified tone of voice to all generated outputs. This step is optional — if no files are uploaded the model will generate content in its default style.
2.7 Submitting the Task
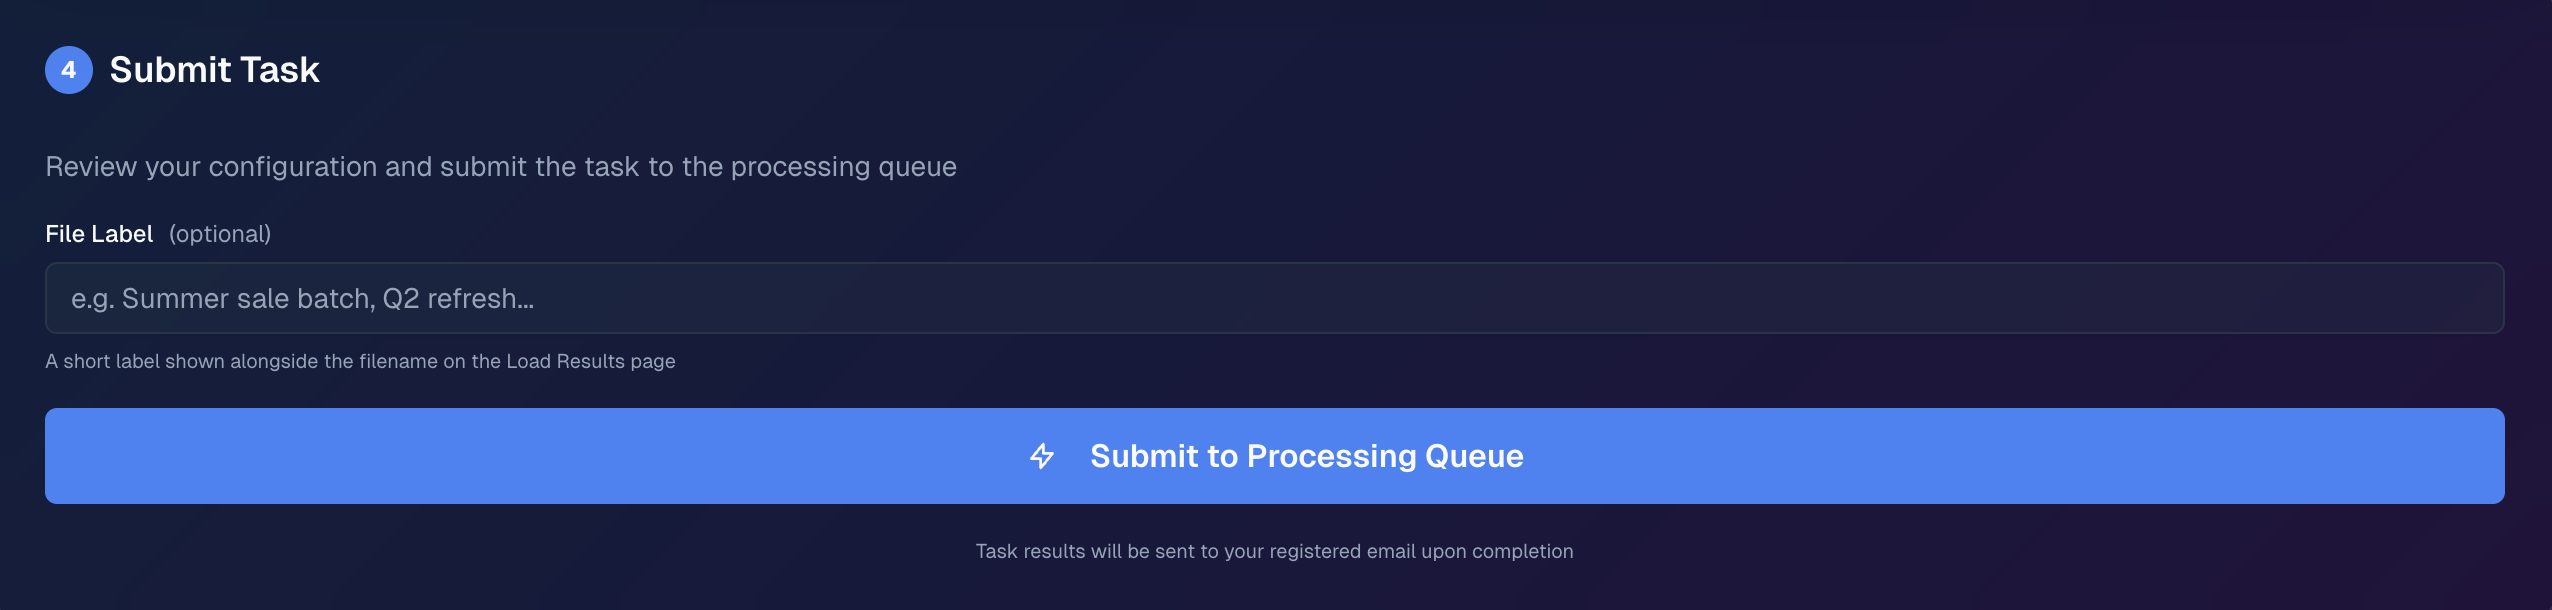
Figure: Submit Task step on Generate Text — optional File label and Submit to Processing Queue.
1. File label (optional)
Enter a label to help you recognise this run later. The label is shown in the success dialog after submission and appears alongside the filename on the Load Results page.
2. Submit to Processing Queue
Click to submit the task. A task summary dialog will appear for you to review all settings before final confirmation. After confirming, the task is queued for processing and you will receive an email notification at the address provided when the output is ready.
III. Attribute Cleansing
3.1 About Attribute Cleansing Feature
This page provides a robust tool to cleanse product attributes and fill in missing information within your dataset. Leveraging Google's advanced LLM (Gemini), the tool allows you to clean and standardise specific attributes of the product, such as titles, descriptions, or product types, ensuring consistency and accuracy. Additionally, it helps fill any gaps in the data, enhancing the completeness of your product information.
By using this feature, you can significantly improve the quality and integrity of your data, making it better suited for analysis, reporting, and content generation.
3.2 Uploading Data
This section provides a detailed guide on how to upload your PIM data to the application.
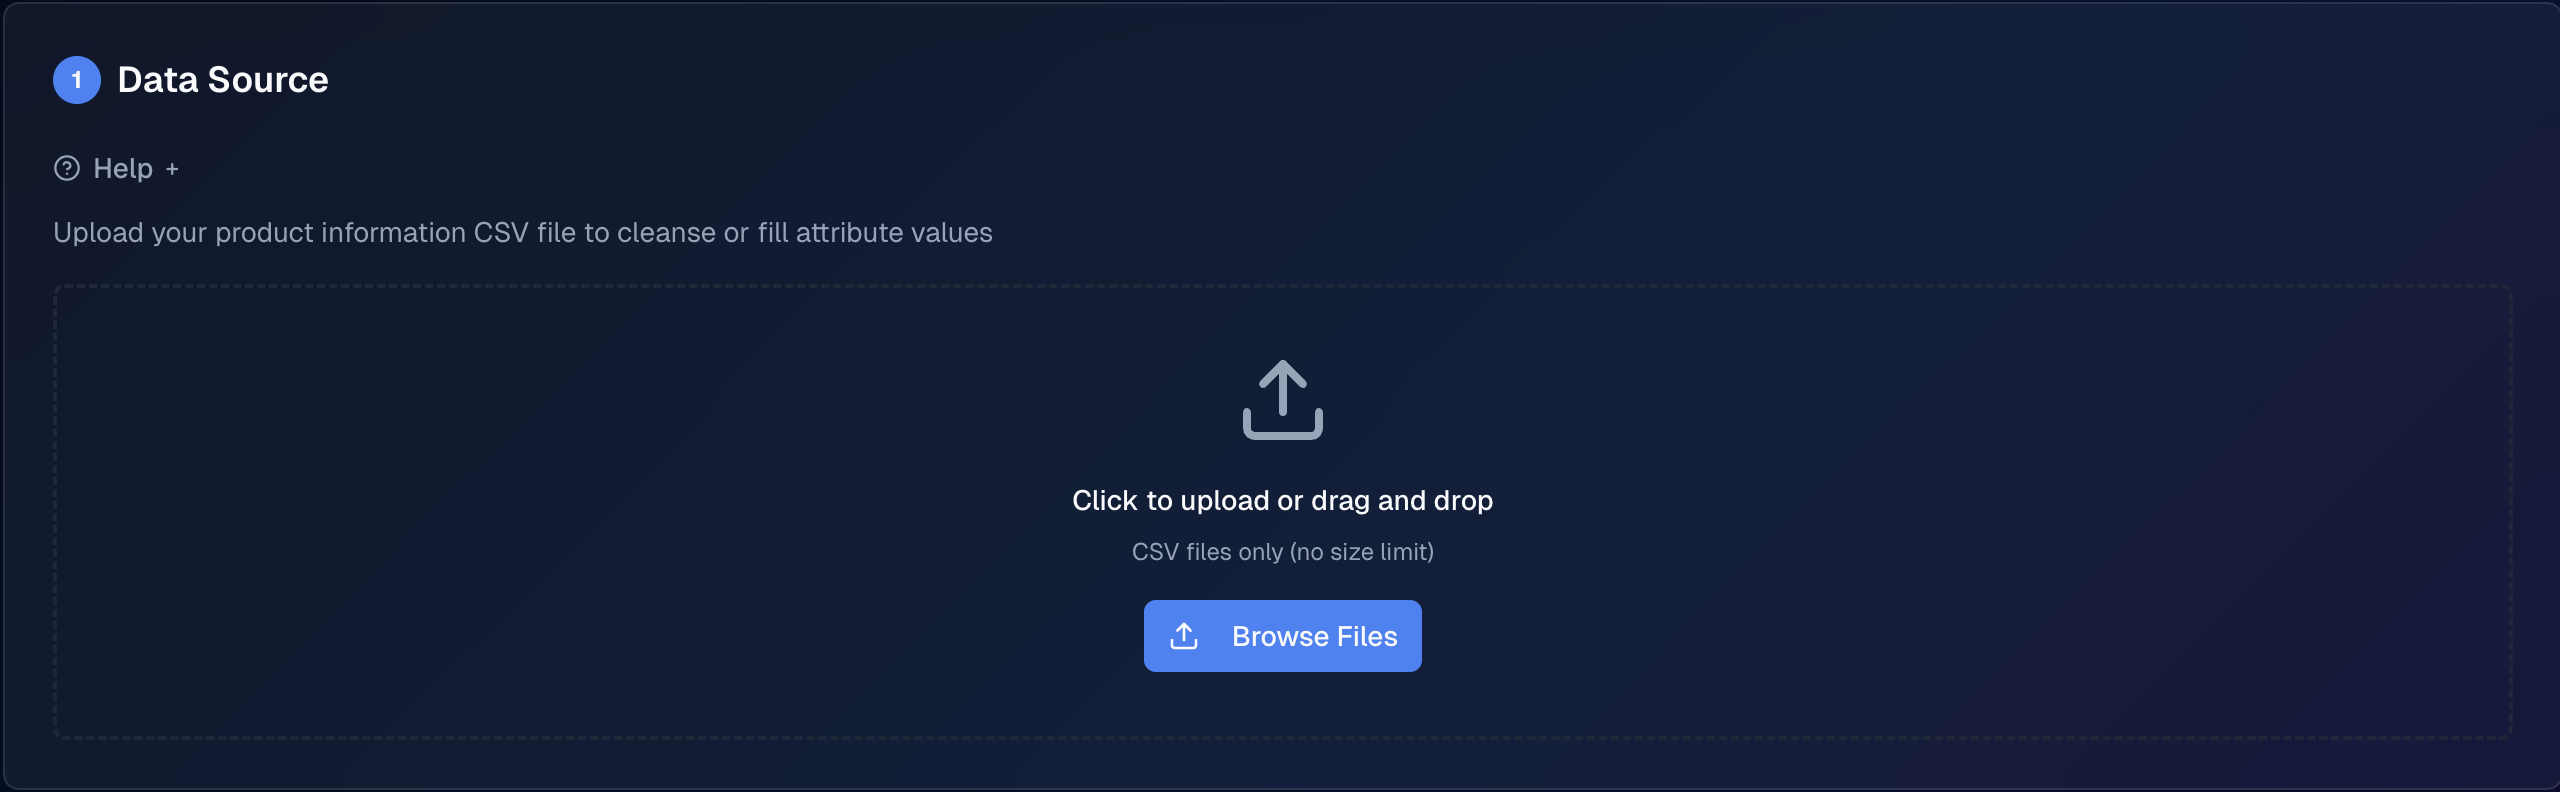
Figure: Data source step — upload and validate your PIM CSV.
1. Data Source Card
Upload your PIM data as a CSV file. The file must be in CSV format. The first row should contain the column headers. Include columns for the attribute(s) you will cleanse or fill and for any assisting attributes you configure in the LLM parameters. A product description column is only needed if that is the attribute you are cleansing or filling. If you wish to perform A/B tests, a product ID column is also required.
2. Help Dropdown
A help section is available, providing the necessary information to correctly upload the file in the required format. It also includes a sample data structure.
3. Upload File / Browse
Upload the file by dragging and dropping it into the upload area or by clicking the Browse files button.
Once the file has been uploaded and validated, the following are available (matching Generate Text):
- Column Statistics — an expandable section that shows, for each column, distinct value count, missing count, and duplicate count, plus the total row count when validation completes.
- Data Preview — an expandable table preview limited to the first 50 rows of your uploaded file, so you can verify that the data was read correctly before proceeding.
3.3 Parameter Selection
The parameters you choose here steer the cleanse or fill job: they identify the attributes to update, the task type, and the assisting context the model should rely on alongside your CSV columns.
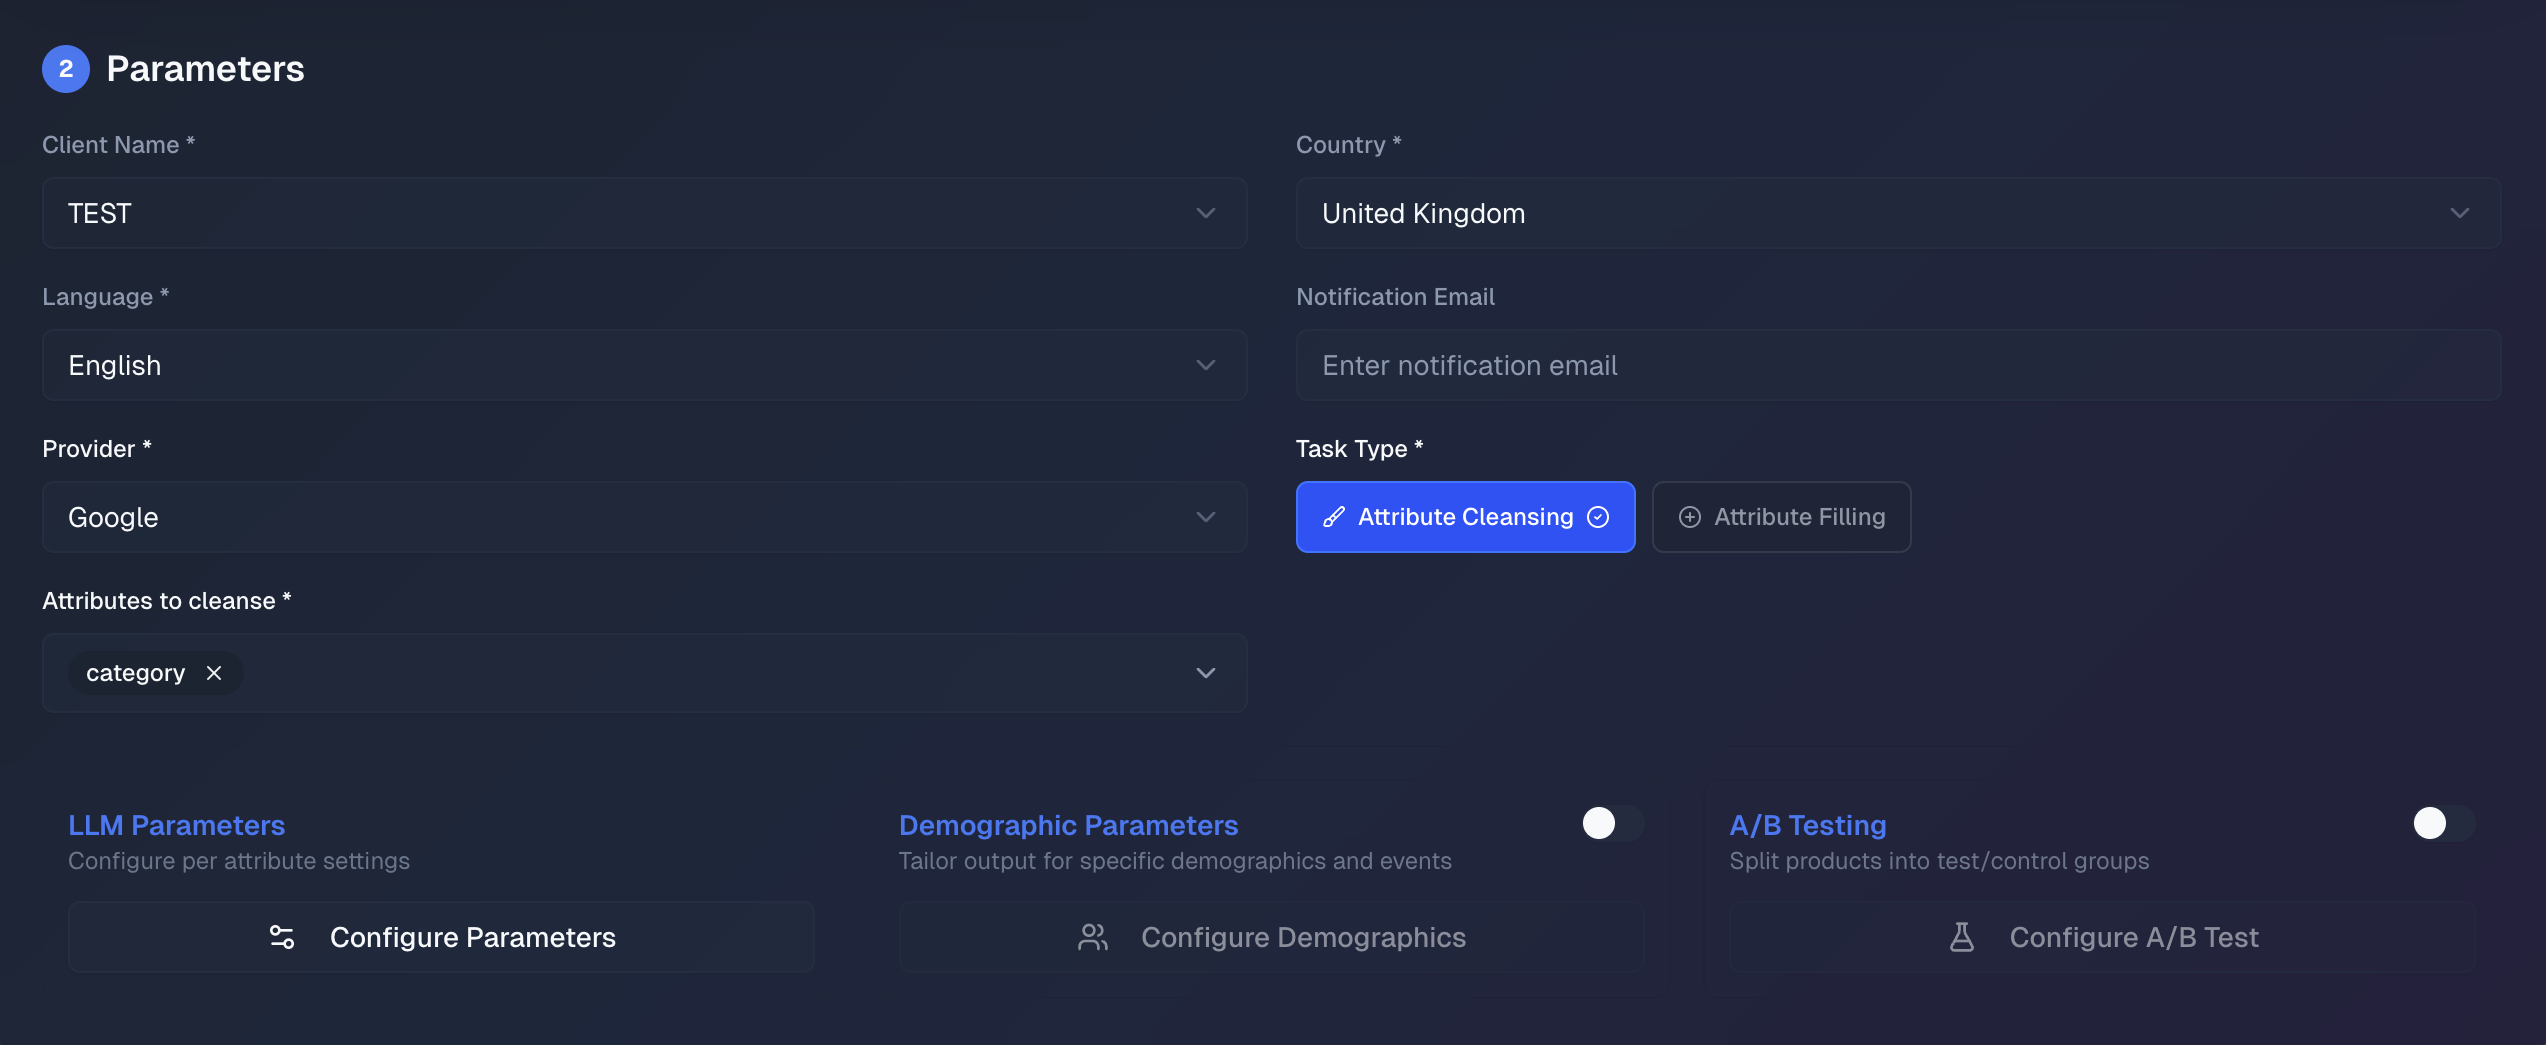
Figure: Parameter selection — client, country, language, notification email, provider, task, attributes to process, LLM/Demographics/A/B cards.
1. Client
Adding the client's name helps the LLM to better tailor its responses, ensuring the generated content is more aligned with the client's specific product or brand.
2. Country
Select the target country for the output to tailor the generated content to align with the specific market.
3. Language
Select the desired language for the output. The available languages are drawn from the application's configuration.
4. Notification Email
Enter the email address where a completion notification should be sent once the task has been processed.
5. Provider
The destination platform where the products will be listed. Currently supports Google Merchant Center.
6. Task
Select the task type:
- Attribute Cleansing — removes unwanted characters and irrelevant information, ensuring the attribute is refined and consistent.
- Attribute Filling — fills missing information or gaps using the LLM, generating suitable content to replace missing data.
7. Attributes to process
Select one or more attributes from your data that require cleansing or filling (the label reflects the task you chose: Attributes to cleanse or Attributes to fill). This is directly linked to the task parameter.
8. Product ID Column (when continuing from Review Summarisation only)
This field appears only when you reach Attribute Cleansing via passthrough from Review Summarisation. Select which column in your uploaded data identifies each product so it matches the review task’s product IDs. For A/B testing in a normal (non-passthrough) session, product IDs and assignments are configured in the A/B test modal.
9. LLM Parameters
Click Configure Parameters to open the LLM parameters modal and fine-tune settings per attribute. See Section 3.4 for details.
10. Demographics Toggle
Enable this toggle to open the demographics modal and configure audience targeting. The demographics options are the same as those available in the Generate Text feature — see Section 2.4 for a screenshot and full description of each field.
11. A/B Test Toggle
Enable this toggle to configure an A/B test. This opens the A/B test modal — see Section IV.
3.4 LLM Parameter Selection
After selecting the general parameters, click Configure Parameters to open the LLM parameters modal. These parameters directly influence the LLM's ability to effectively cleanse or fill the selected attributes.
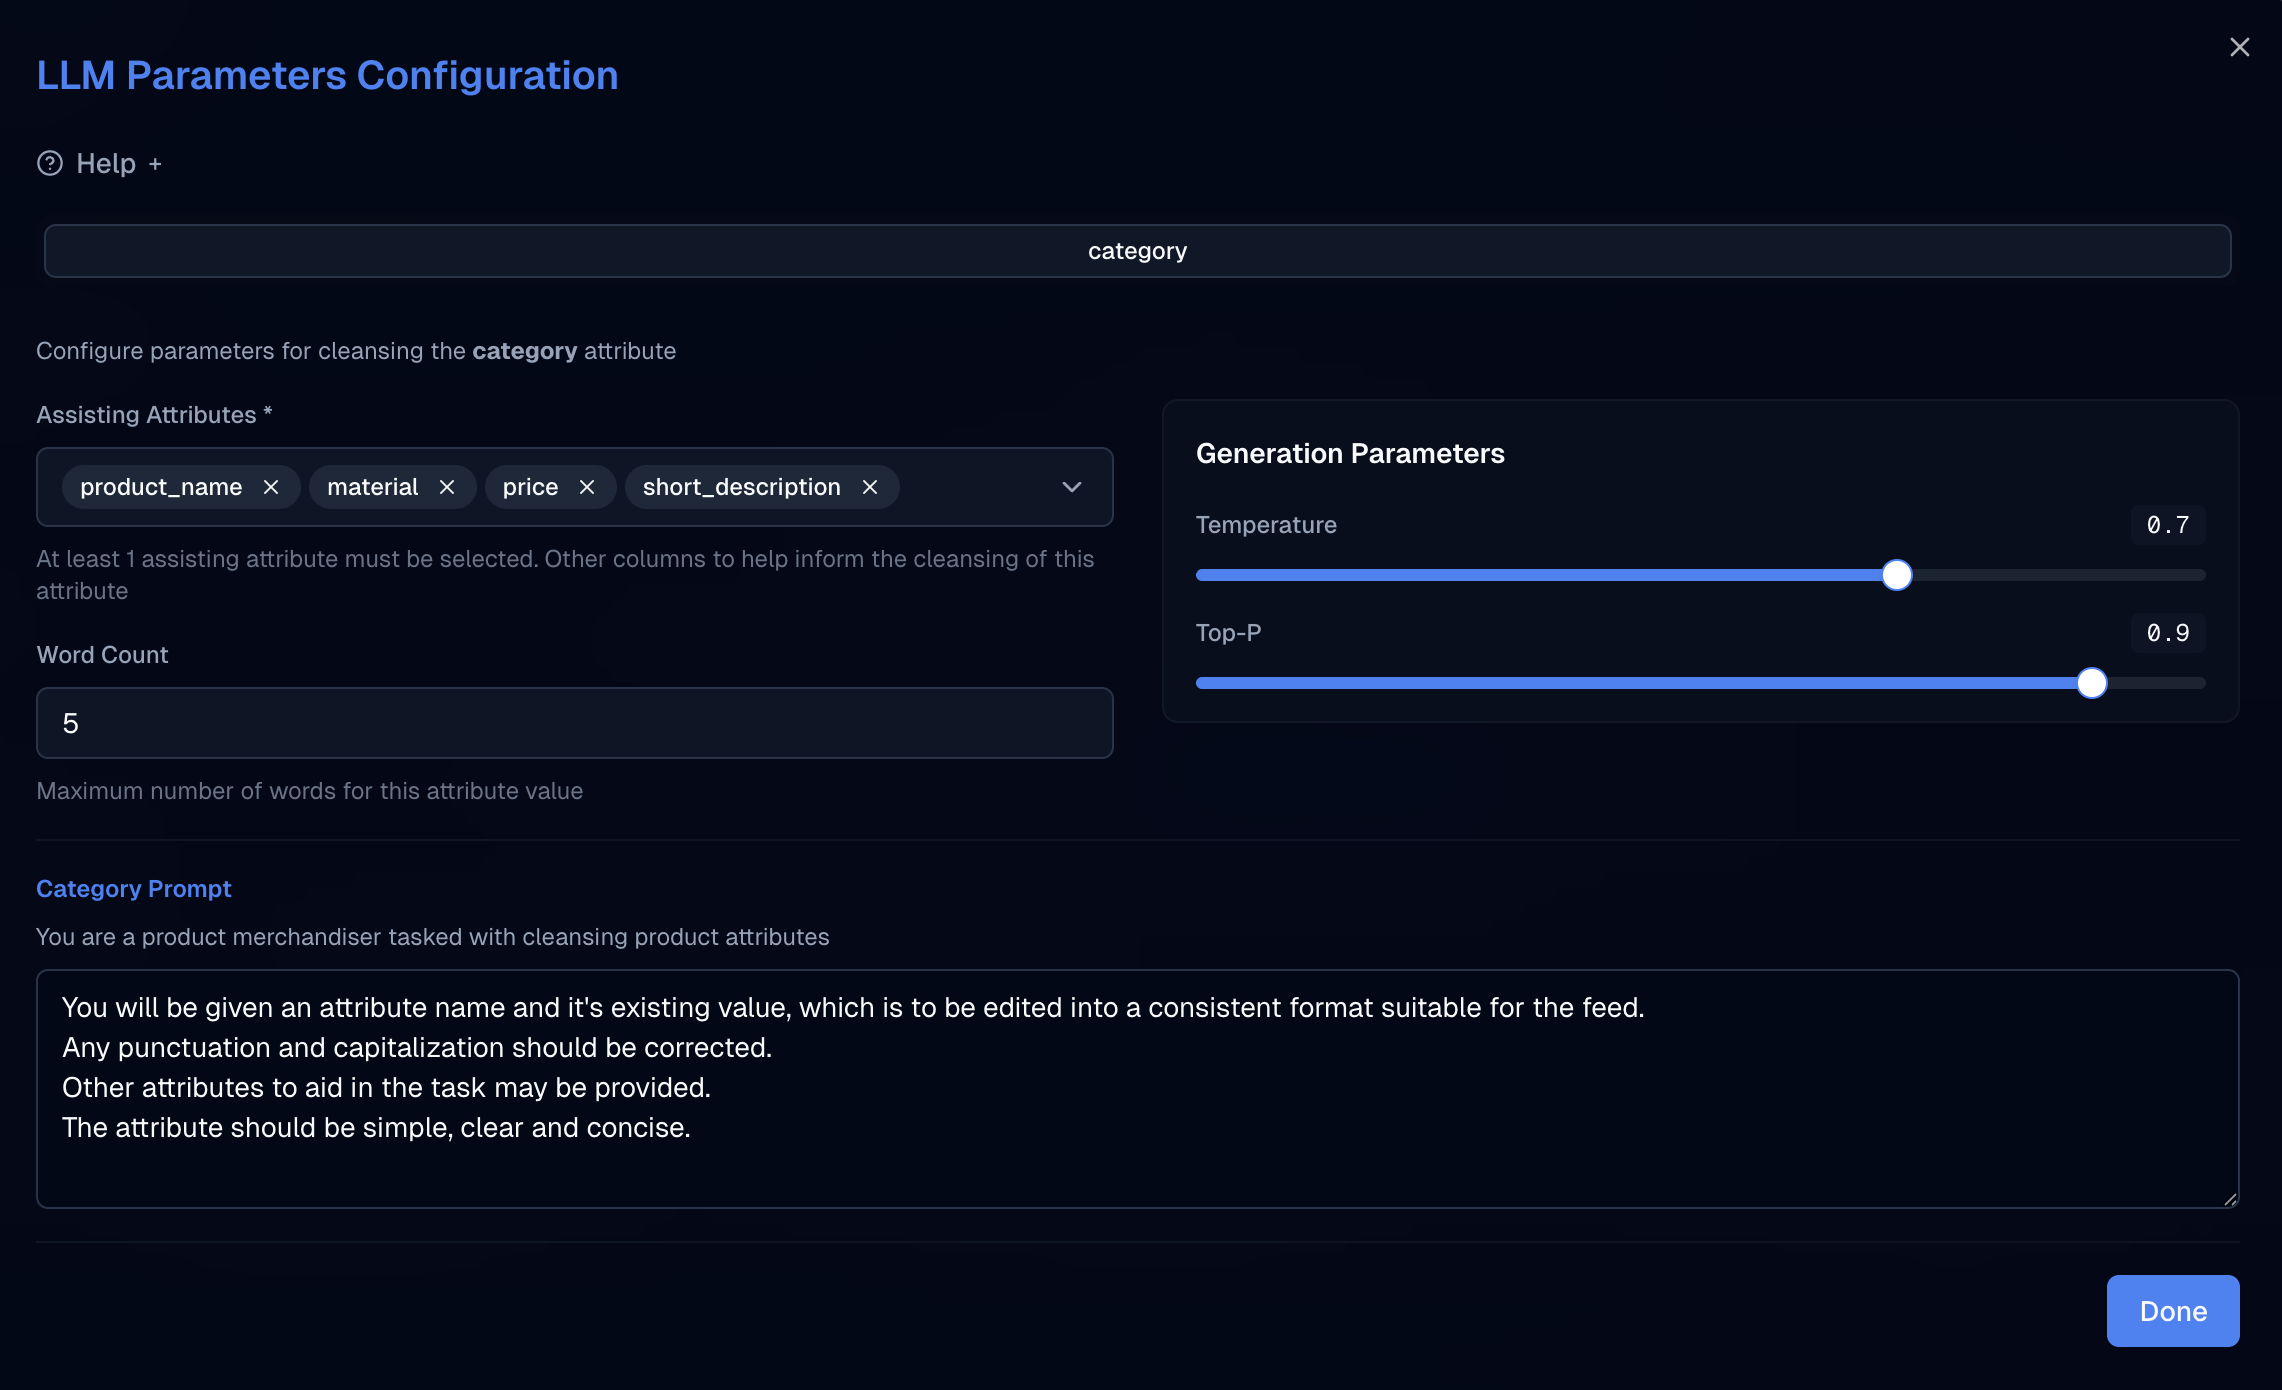
Figure: LLM parameters modal — one tab per selected attribute.
1. Help
A help section is available at the top of the modal.
2. Assisting Attributes
Select one or more columns that can help the LLM gain a better understanding of the product in order to cleanse or fill the attribute more accurately.
Note: It is required to select at least one assisting attribute to ensure the LLM has sufficient context to perform the task effectively.
3. Word Count
Specify the approximate word count for the generated output.
4. Temperature
Controls creativity (0–1). A lower value produces less creative, more predictable output; a higher value produces more creative but potentially unconventional output.
5. Top-P
Controls word-choice probability (0–1). Lower values restrict the model's word choices to the most probable options, producing more conservative output.
6. Prompt Customisation
The first line of the prompt is fixed and cannot be altered. The editable section allows you to tailor the prompt to your specific requirements.
LLM parameters 2–6 repeat for each attribute selected for the task, allowing tailored cleansing or filling settings per attribute.
3.5 Submitting the Task
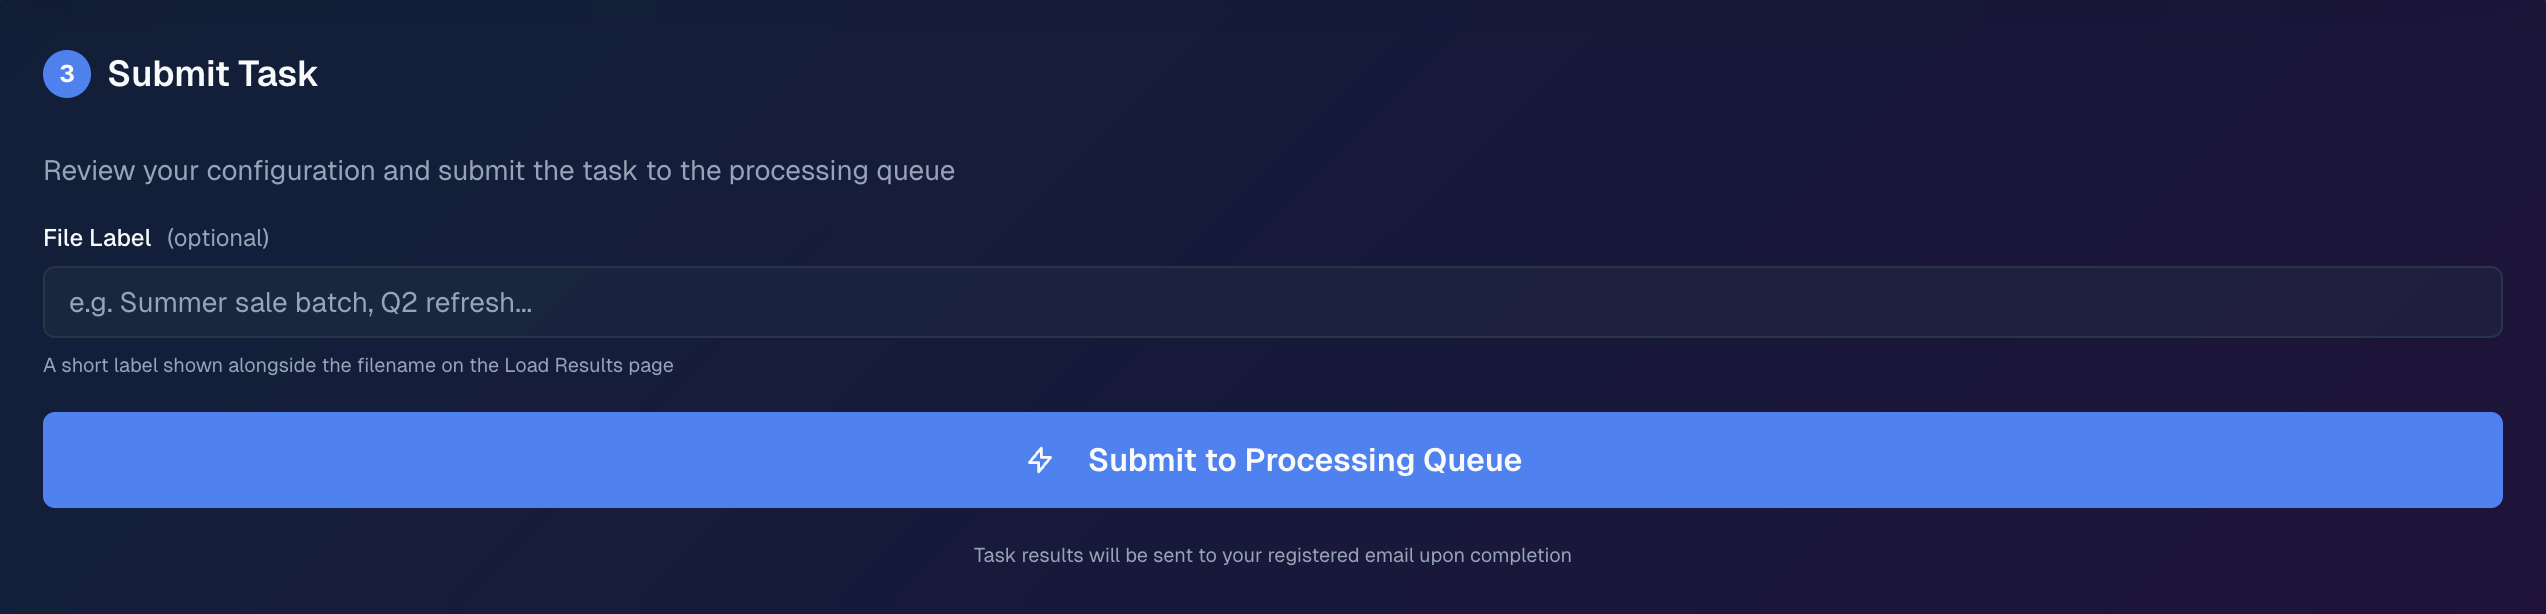
Figure: Submit Task step on Attribute Cleansing — optional File label and Submit to Processing Queue.
1. File label (optional)
Enter a label to help you recognise this run later. The label is shown in the success dialog after submission and appears alongside the filename on the Load Results page.
2. Submit to Processing Queue
Click to submit the task. A task summary dialog will appear for review before final confirmation. After confirming, you will receive an email notification when the output is ready.
IV. A/B Testing
4.1 About A/B Tests
A/B testing allows you to compare two versions of a product's content (such as descriptions, titles, or key selling points) to determine which one performs better. By testing different variations, you can evaluate the effectiveness of changes and make data-driven decisions to optimise product presentation and engagement.
A/B testing is not a standalone page. It is accessed via the A/B Test toggle within the Parameter Selection step on either the Generate Text or Attribute Cleansing pages. Enabling the toggle opens the A/B Test modal dialog, where you upload your historical performance data and configure the test parameters.
The A/B testing tool evaluates whether statistically significant results can be achieved for a specific time period and metric using the provided data. Generally, a larger dataset with more products increases the likelihood of conducting a valid test.
The historical data must be structured in a time-series format, including a date column and a product ID column that matches the IDs in your product data. The dataset must contain the specific metric you aim to analyse, and must include at least four weeks of data, excluding the period designated for running the tests.
After the data is validated, if a valid test design is identified, the data is divided into test and control groups. The test group will receive the generated output, while the control group will remain unchanged.
The output data will include a column named ab_test, which identifies the groups:
- Test group (receives generated output): labelled 1
- Control group (retains original data): labelled 0
Crossover Tests
If you choose the crossover option, the test will be conducted in two phases to provide more robust results. In the first phase, Group 1 receives the generated output while Group 2 retains their original data. At the midpoint, the groups switch. This approach accounts for seasonality in the data. Crossover tests require an even number of weeks. A washout period is included at the start of each phase to prevent carryover effects.
In crossover mode, the ab_test column uses:
- 1 — assigned to receive generated output during the first half
- 2 — assigned to receive generated output during the second half
4.2 Uploading Historical Data File
The A/B test modal is opened by enabling the A/B Test toggle on the Parameters step. The modal contains an upload area for your historical performance data.
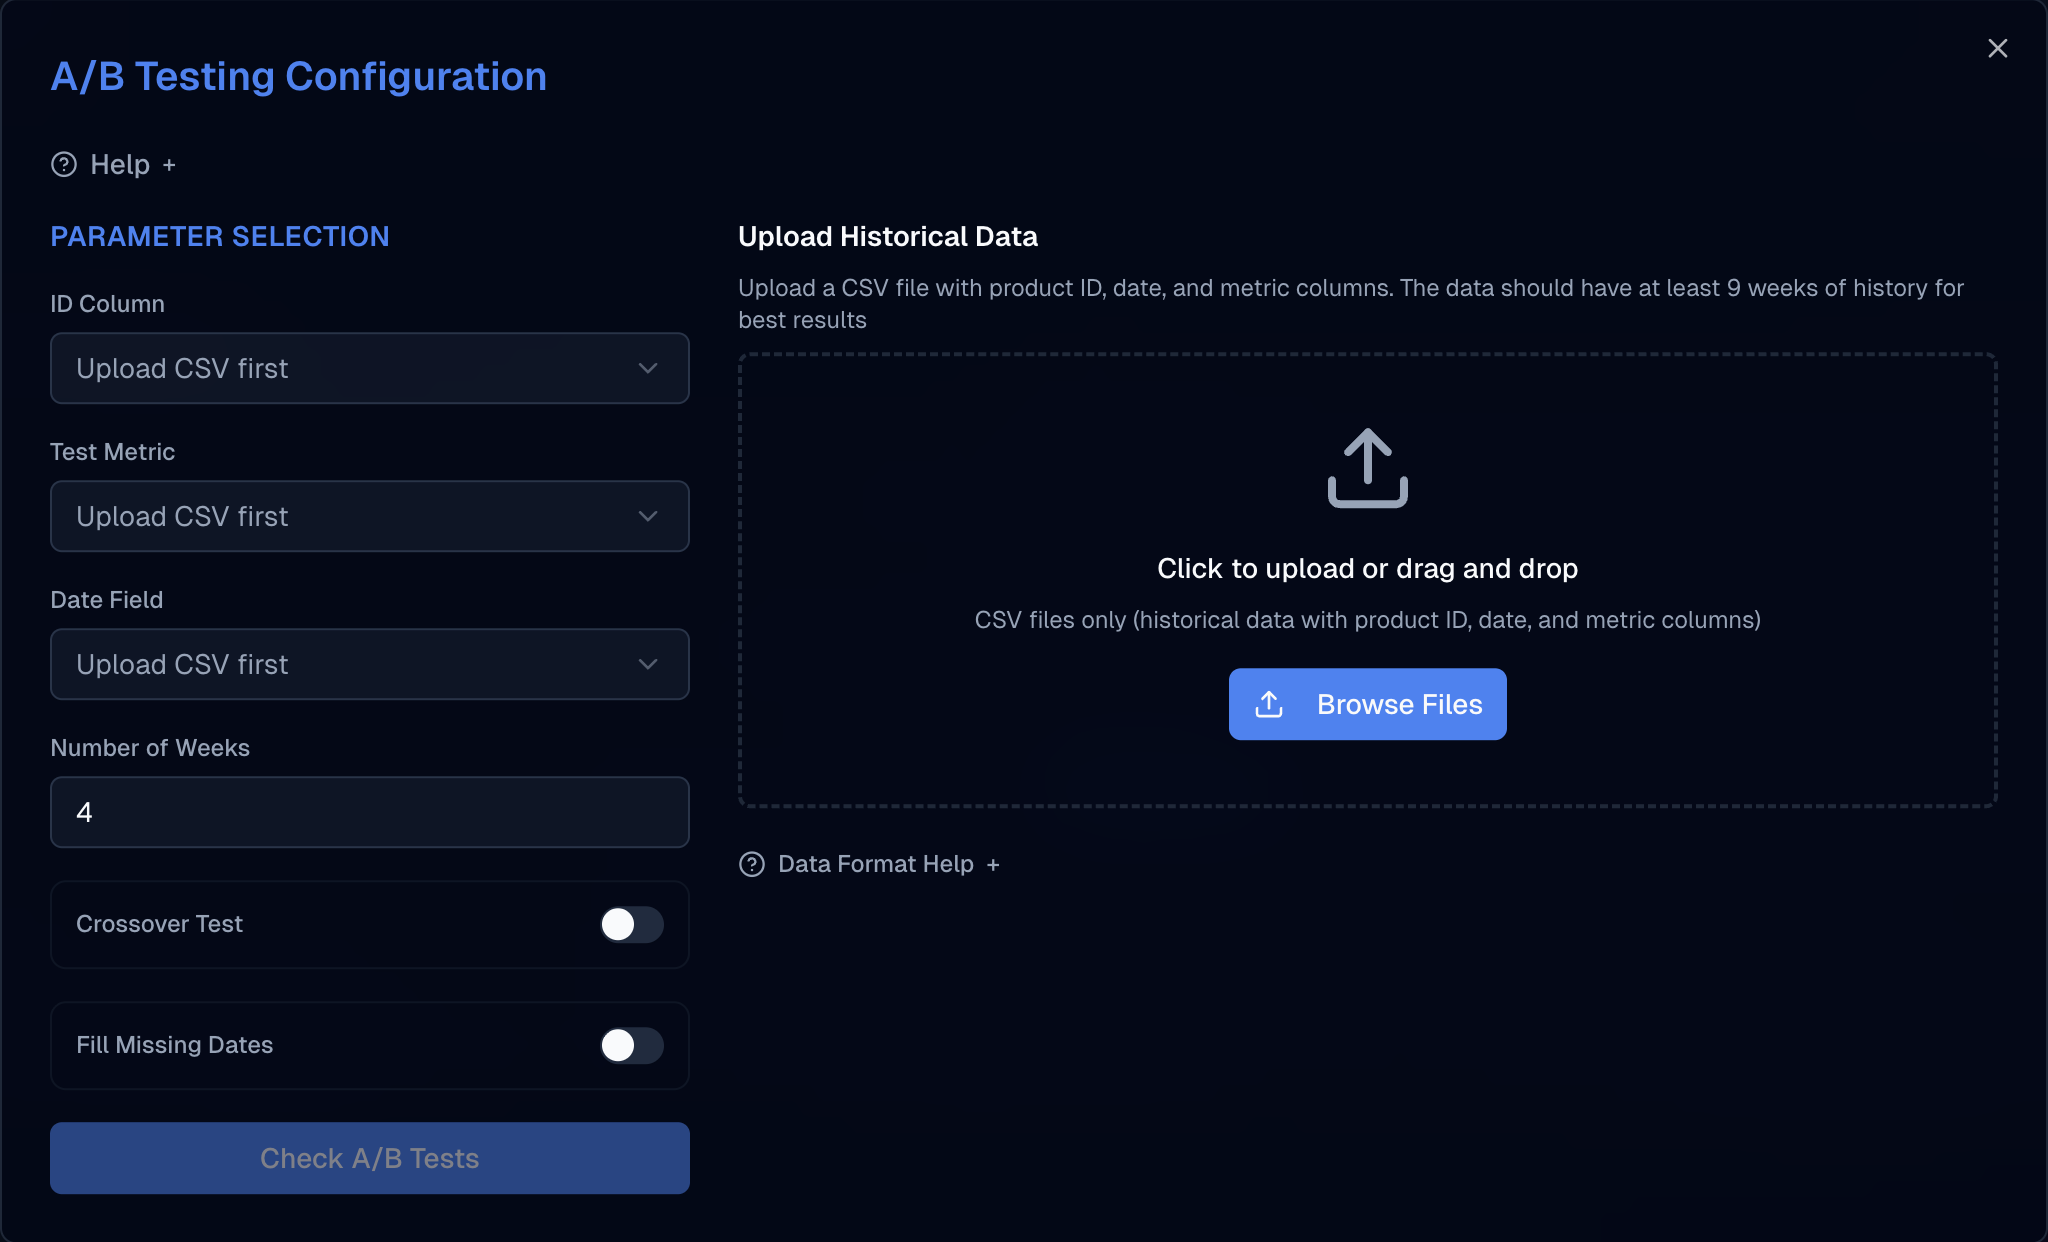
Figure: A/B Test modal — upload historical performance data and configure test parameters.
1. Data Upload Help
A help section is available within the modal, providing the necessary information to correctly format the upload file.
Ensure your file adheres to the following guidelines:
- The file must be in CSV format.
- The first row should contain column headers.
- The file must include: a Product ID column (matching the IDs in your product data), a Date column for time-series data, and columns containing the metrics you wish to analyse during the test.
2. Upload File
Upload the file by dragging and dropping it or by clicking Browse files.
4.3 Parameter Selection
Selecting the right parameters for an A/B test is critical to ensure meaningful and reliable results. These parameters — such as the time period, test metric, and test type — should align with the objectives of the analysis. Configure these in the same A/B Test modal after uploading your historical file (see above).
1. Help
A help dropdown is available to provide information about each parameter.
2. ID Column
Specify the column in the historical dataset that contains the product IDs. This is essential to accurately associate the data with individual products and split them into test and control groups.
3. Test Metric
Select the specific metric from the dataset that will be the basis for running the A/B test. The chosen metric determines the focus of the analysis and influences the validity of the test results.
4. Date Field
Specify the column in the dataset that contains the date information.
5. Number of Weeks
Define the duration of the A/B test by selecting the number of weeks to include in the analysis. At least four weeks of historical data (prior to the test period) is required.
6. Crossover Test
Toggle on to enable a crossover design, which alternates test and control groups midway through the test to account for seasonality. If unchecked, a standard A/B test will be performed where the groups remain fixed throughout.
7. Fill Missing Dates
When enabled, any dates that are missing for a product in the historical dataset will be filled with a value of 0, on the assumption that there was no activity on those dates. This helps avoid gaps in the time series that could otherwise affect the validity of the test design.
8. Check A/B Tests
Click this button to initiate the validation process. The application verifies whether a valid test design can be created based on the parameters you have selected. If satisfied with the design, confirm to apply it to the task.
V. Review Summarisation
5.1 About Review Summarisation
This page provides a tool to automatically summarise product reviews using Google's LLM, Gemini. By uploading a CSV file containing product reviews, the tool can generate summaries, extract highlights and lowlights, and provide a sentiment score for each product's review set.
Passthrough feature: Review summarisation outputs can optionally be passed directly into a subsequent Generate Text or Attribute Cleansing task. Configuration is done in the Parameters step; see Section 5.5.
5.2 Uploading Review Data
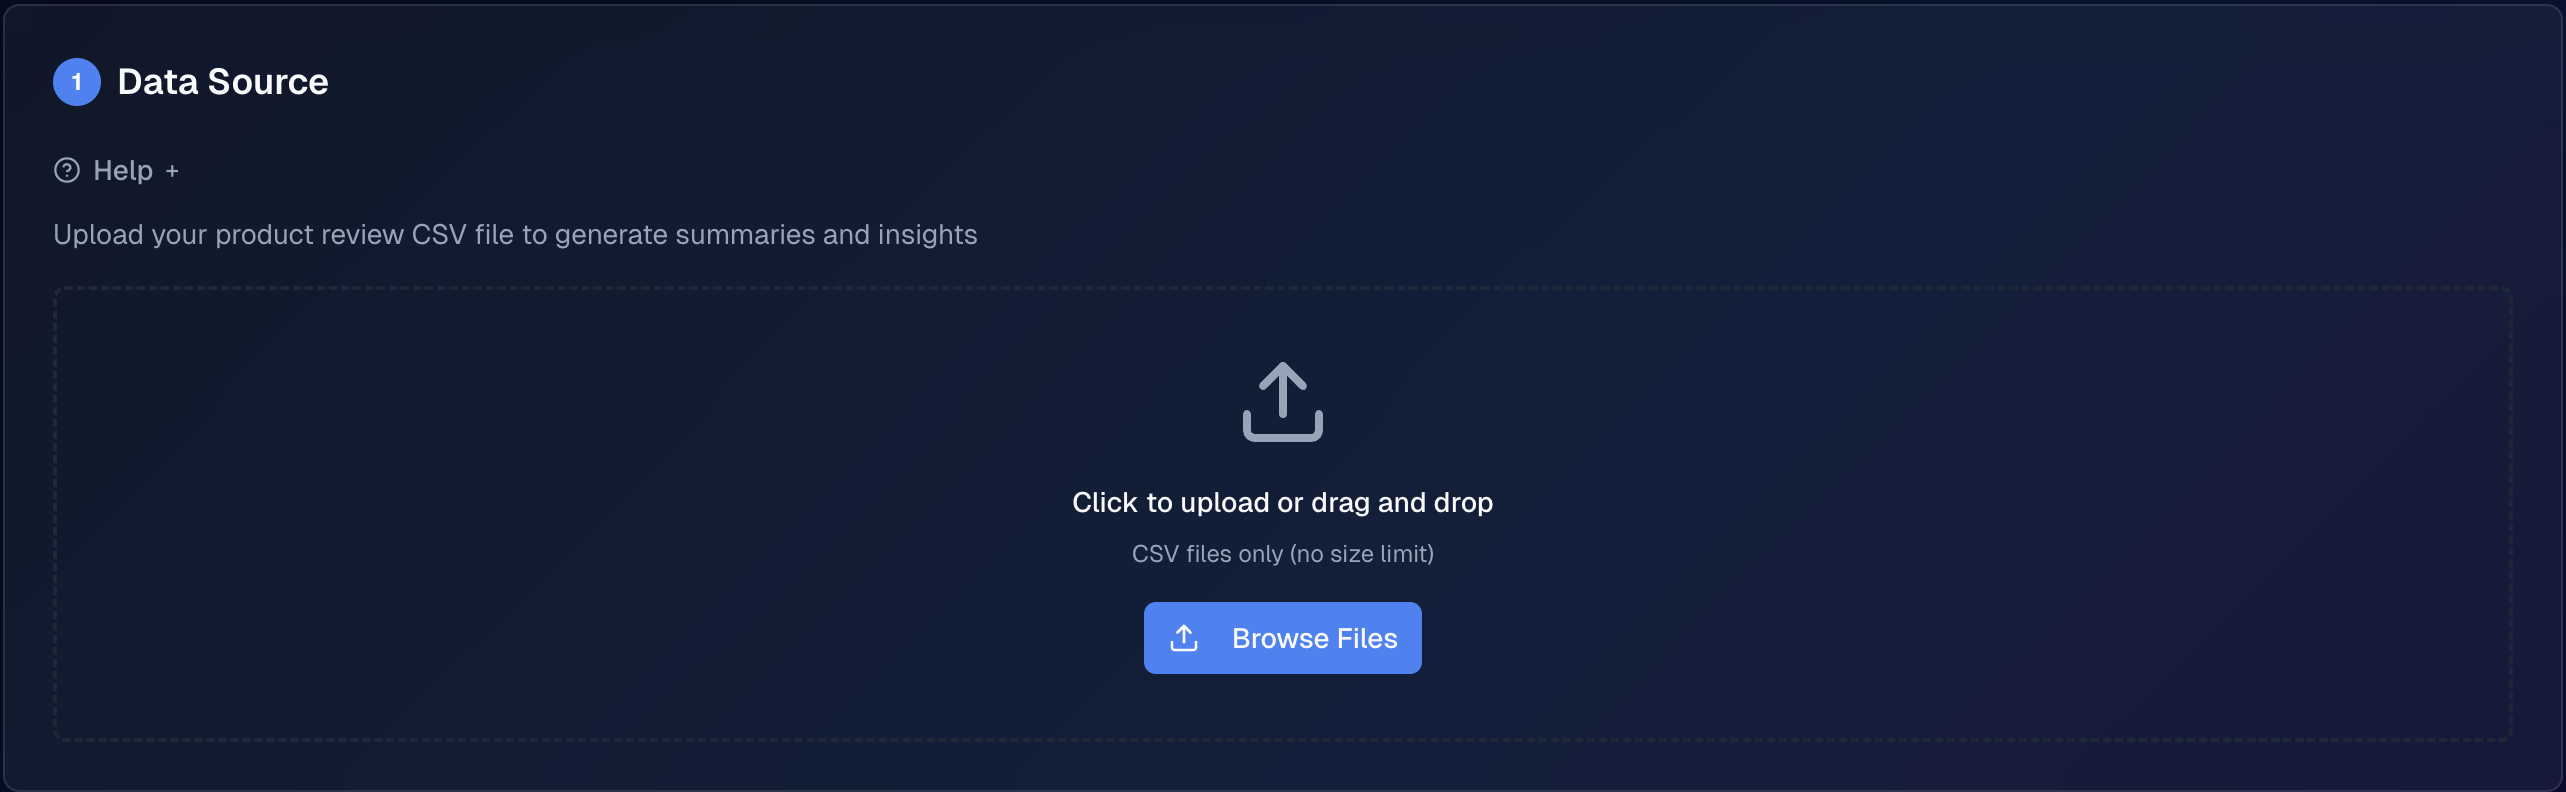
Figure: Data source step — upload and validate your review CSV.
1. Data Source Card
Upload a CSV file containing your product review data. The file must be in CSV format with column headers in the first row. The file must include a column for product IDs and a column containing the review text. Column mappings are configured in the parameters step.
2. Help
A help section provides a sample data structure and upload guidance.
3. Upload File
Upload by dragging and dropping or by clicking Browse files.
Once the file has been uploaded and validated, the following are available (matching Generate Text):
- Column Statistics — an expandable section that shows, for each column, distinct value count, missing count, and duplicate count, plus the total row count when validation completes.
- Data Preview — an expandable table preview limited to the first 50 rows of your uploaded file, allowing you to verify that the data has been read correctly before proceeding.
5.3 Parameter Selection
On this step map the product and review columns, and tune how the model should respond for summaries, highlights, lowlights, or sentiment.
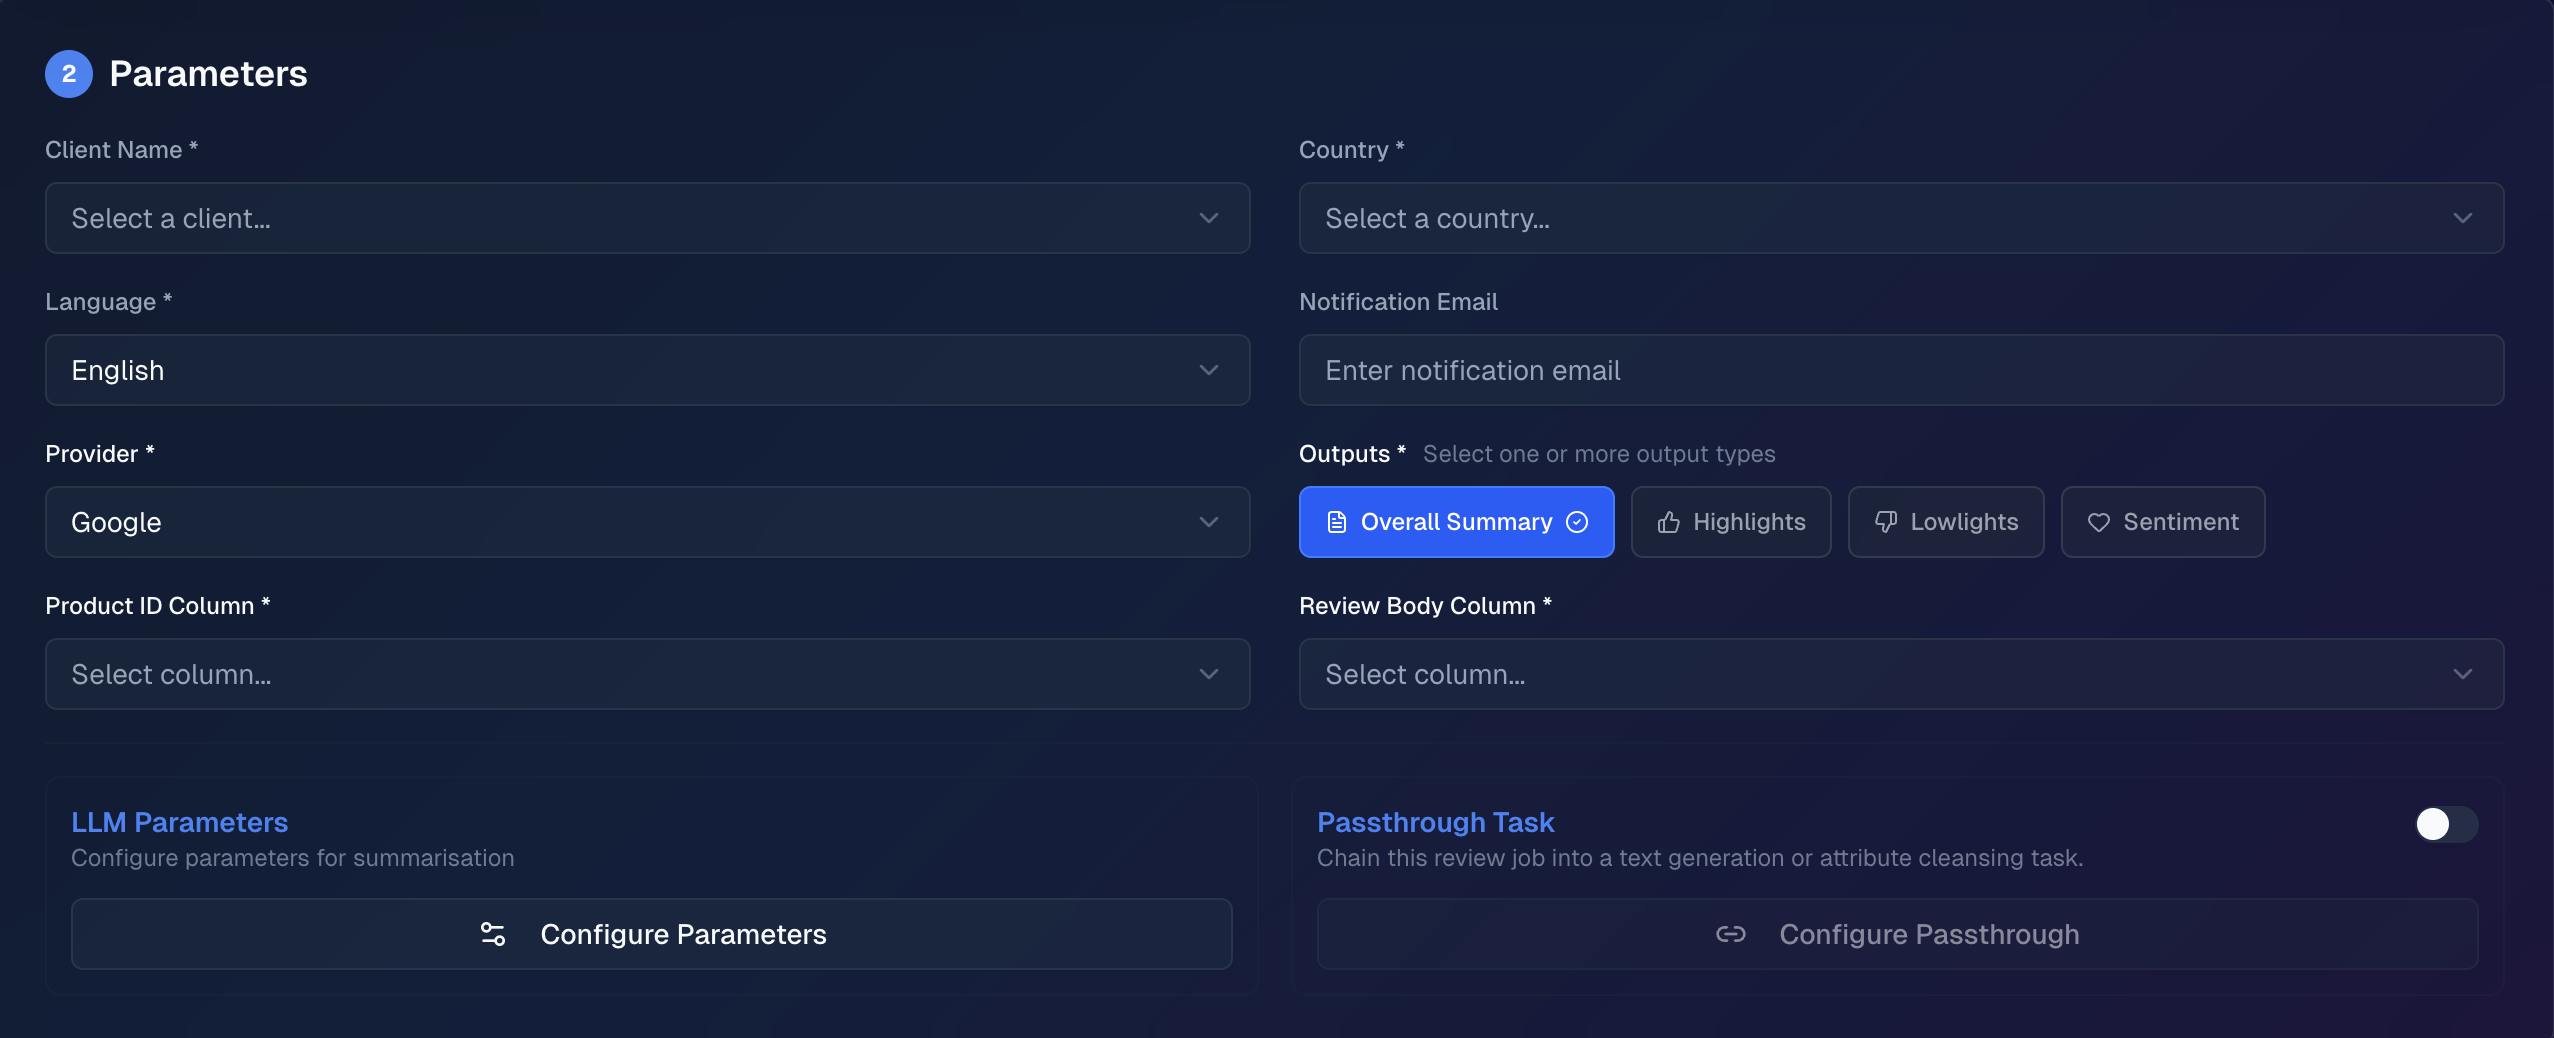
Figure: Parameter selection — client, country, language, notification email, provider, outputs, product ID and review body columns, LLM Parameters and Passthrough Task.
1. Client
Adding the client's name helps the LLM to better tailor its responses, ensuring the generated content is more aligned with the client's specific product or brand.
2. Country
Select the target country for the output to tailor the generated content to align with the specific market.
3. Language
Select the desired language for the output. The available languages are drawn from the application's configuration.
4. Notification Email
Enter the email address where a completion notification should be sent once the task has been processed.
5. Provider
The destination platform where the products will be listed. Currently supports Google Merchant Center.
6. Outputs
Select one or more review outputs to generate:
- Summary — an overall summary of all reviews for each product
- Highlights — positive themes and points frequently praised in reviews
- Lowlights — negative themes and points frequently criticised in reviews
- Sentiment — overall sentiment score for each product's reviews
7. Product ID Column
Select the column in your review data that contains the product IDs.
8. Review Body Column
Select the column in your review data that contains the review text.
9. LLM Parameters
Click Configure Parameters to open the LLM parameter modal and fine-tune the model's behaviour. See Section 5.4 for details.
10. Passthrough Task (shown when at least one output is selected)
Toggle Passthrough Task on if you want to forward review outputs into a downstream task, then use Configure Passthrough to choose the destination and which outputs to include. See Section 5.5 for details.
5.4 LLM Parameter Selection
After selecting the general parameters, click Configure LLM Parameters to open the LLM parameters modal. This opens a modal dialog with a tab for each output you have selected.
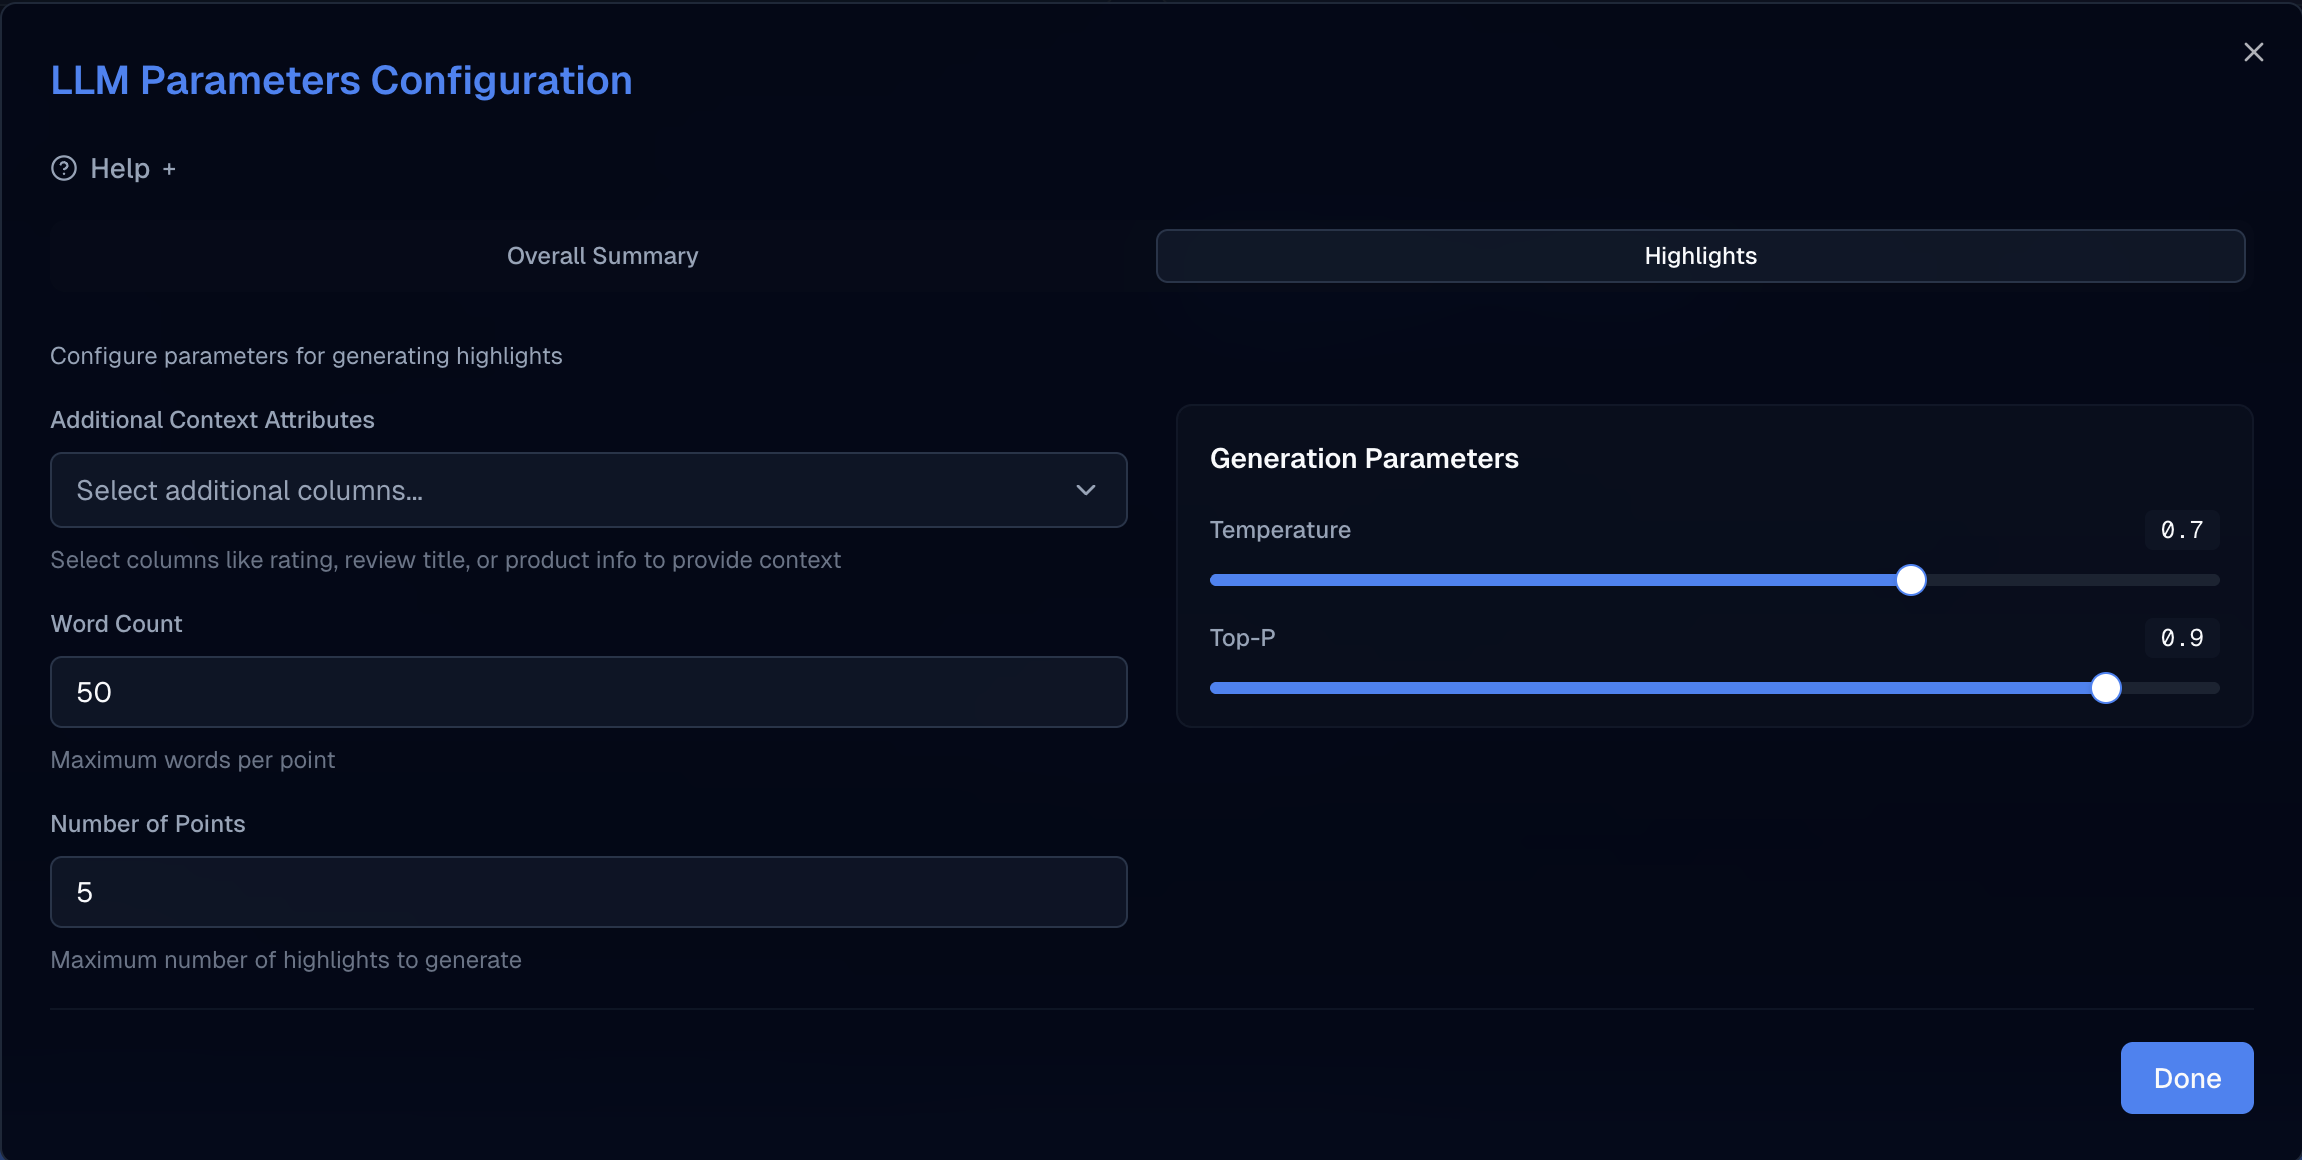
Figure: LLM parameters modal — one tab per selected output.
1. Help
A help section is available at the top of the modal, providing explanations of each parameter.
2. Additional Context Attributes (optional)
Select one or more columns from your review data (e.g. review title, star rating, product information) to provide additional context to the model, helping it generate more accurate and relevant outputs.
3. Word Count
Specify the approximate maximum number of words to generate. For Highlights and Lowlights this applies per point rather than to the overall output.
4. Number of Points (Highlights and Lowlights only)
Specify the maximum number of highlight or lowlight points to generate for each product. Not applicable to Summary or Sentiment outputs.
5. Temperature
Controls creativity (0–1). A lower value produces less creative, more predictable output; a higher value produces more creative but potentially unconventional output.
6. Top-P
Controls word-choice probability (0–1). Lower values restrict the model's word choices to the most probable options, producing more conservative output.
Parameters 2–6 repeat for each output tab, allowing independent configuration per output type.
5.5 Passthrough Feature
When passthrough is enabled, review summarisation outputs (e.g. summaries, highlights) can be injected into the prompts of a follow-on Generate Text or Attribute Cleansing task, giving the model richer context about how customers perceive the products.
Turn the Passthrough Task toggle on from the Parameters step (see Section 5.3, point 10). When enabled, click Configure Passthrough to open the configuration dialog.
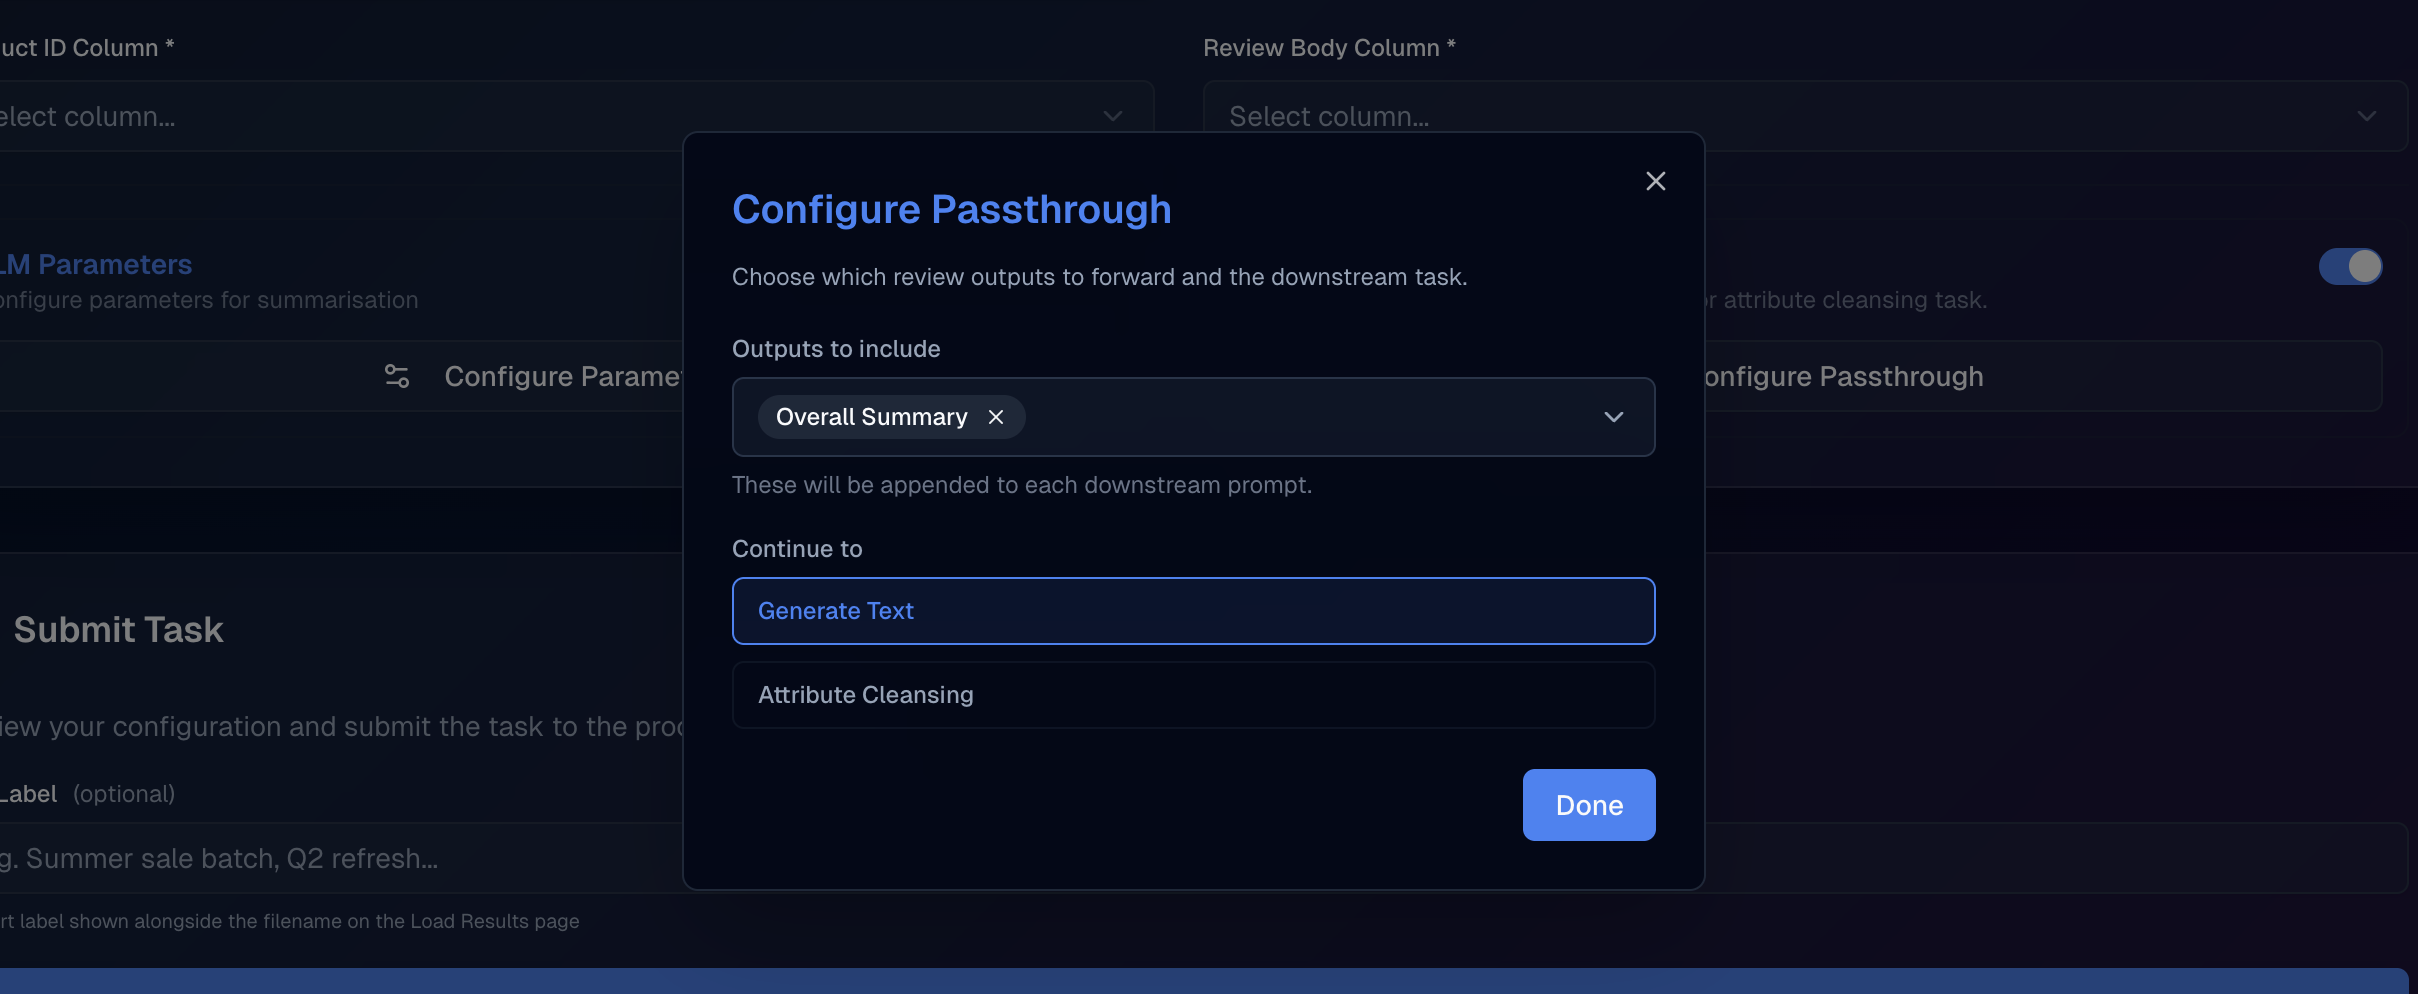
Figure: Passthrough configuration dialog — outputs to include and destination task.
1. Outputs to include
Choose which review outputs (e.g. Overall Summary, Highlights, Lowlights, Sentiment) to append to the prompts of the downstream task. At least one output must be selected; submission will be blocked until this is resolved.
2. Continue to
Choose Generate Text or Attribute Cleansing as the destination page for the downstream task.
When you complete the review flow with passthrough enabled, you are redirected to the selected destination. A banner at the top of that page confirms that review data is being used as additional context. Language, country, client, and provider settings are inherited from your review configuration.
Note: The review summarisation task is still submitted to the processing queue as usual. Passthrough adds the review context to your next task configuration on the destination page.
5.6 Submitting the Task
Figure: Submit Task step on Review Summarisation — optional File label and Submit to Processing Queue.
1. File label (optional)
Enter a label to help you recognise this run later. The label is shown in the success dialog after submission and appears alongside the filename on the Load Results page.
2. Submit to Processing Queue
Click to submit the task. A Task Summary dialog opens so you can confirm your settings; it includes a read-only Passthrough Task section showing whether passthrough is on, the chosen destination, and which outputs are included when you enabled passthrough. After you confirm, if you enabled passthrough you will be redirected to Generate Text or Attribute Cleansing to continue the chain; otherwise you will receive an email notification when the review output is ready.
VI. Image Analysis
6.1 About Image Analysis Feature
This page provides a tool to automatically extract product attributes by analysing product images using Google's vision-capable LLM, Gemini. By uploading a CSV file containing product image URLs, the tool can identify attributes such as colour, material, pattern, style, and other visual characteristics directly from the images themselves.
This is particularly useful for clients whose PIM data is incomplete or inconsistent, where attributes that are difficult to maintain in text form (such as colour or pattern) are clearly visible in product imagery. Optional context columns from your CSV (for example brand or category) can be supplied alongside the images to improve extraction accuracy.
6.2 Uploading Data
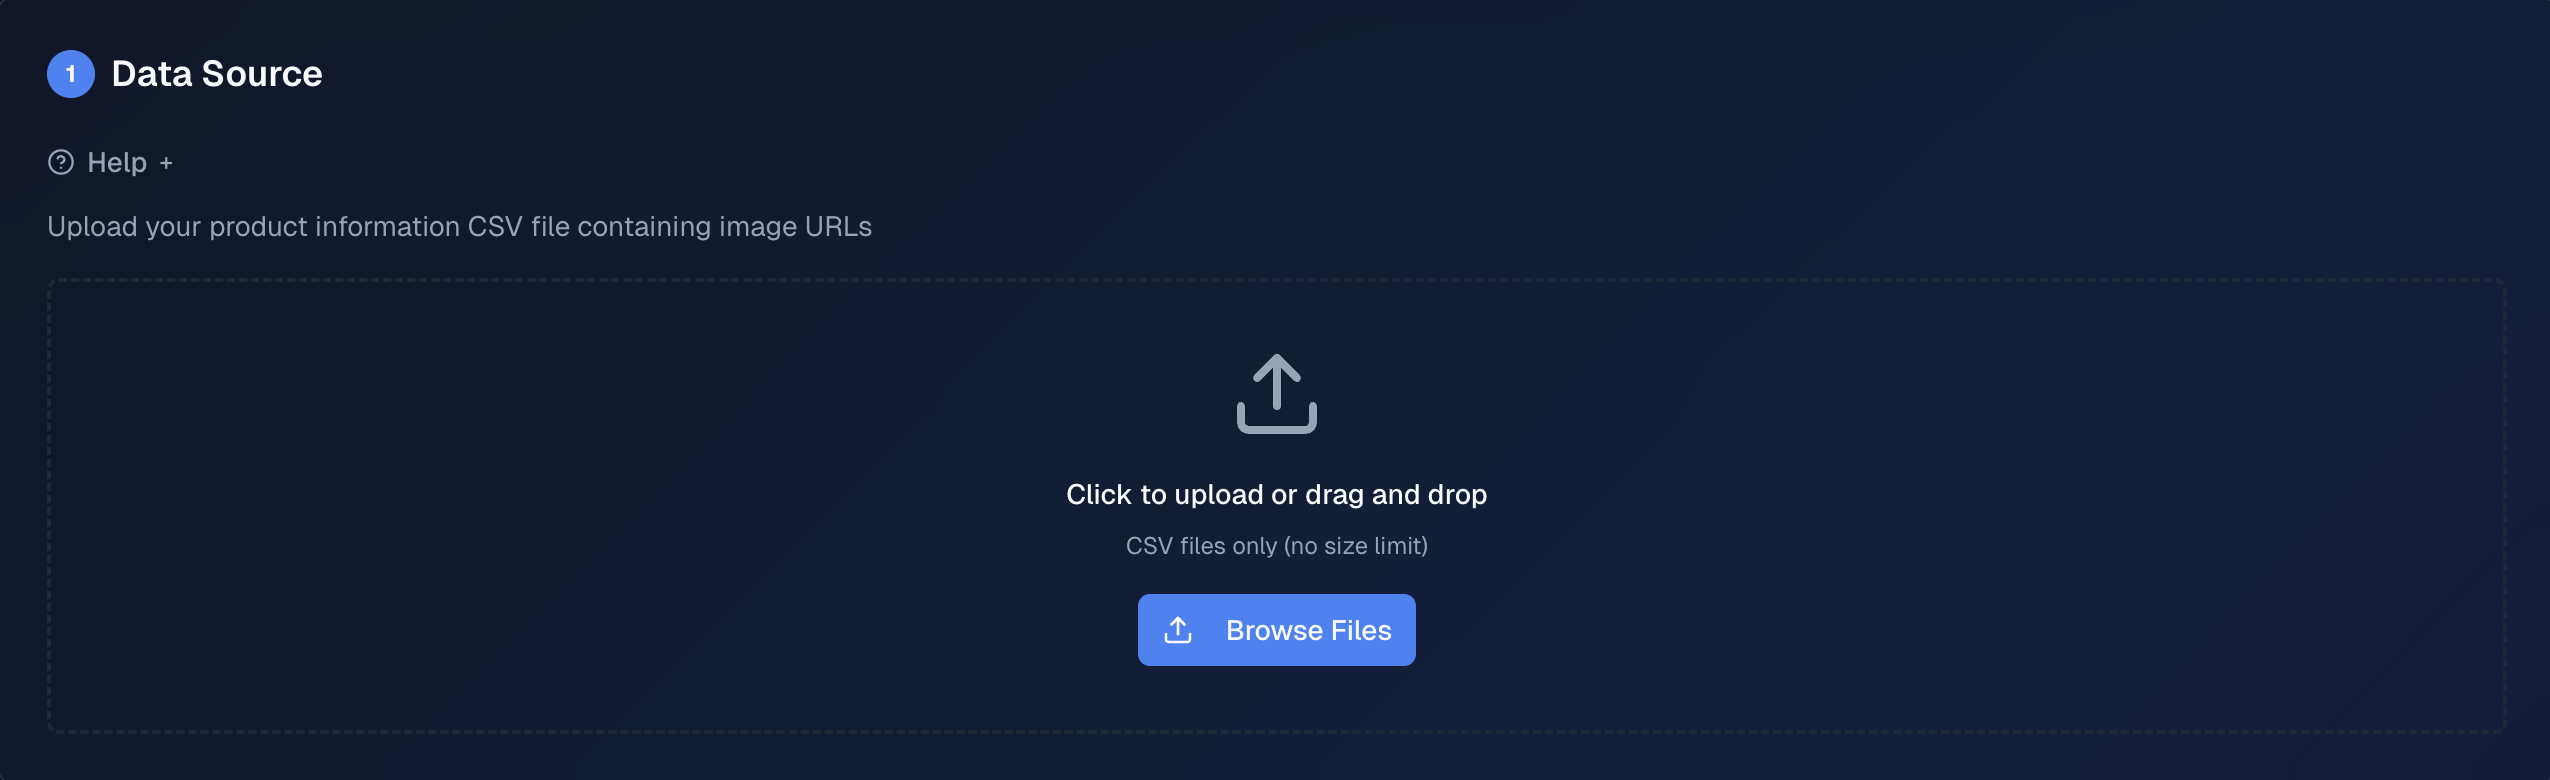
Figure: Data source step — upload and validate your PIM CSV containing image URLs.
1. Data Source Card
Upload your PIM data as a CSV file. The file must be in CSV format with column headers in the first row. The file must include at least one column containing product image URLs. Image URL columns can hold a single URL per row or multiple URLs separated by commas, semicolons, or newlines. Any additional attribute columns (e.g. brand, category) are optional and can be selected later as context.
2. Help Dropdown
A help section is available, providing the necessary information to correctly upload the file in the required format. It also includes a sample data structure.
3. Upload File / Browse
Upload the file by dragging and dropping it into the upload area or by clicking the Browse files button.
Once the file has been uploaded and validated, the following are available (matching Generate Text):
- Column Statistics — an expandable section that shows, for each column, distinct value count, missing count, and duplicate count, plus the total row count when validation completes.
- Data Preview — an expandable table preview limited to the first 50 rows of your uploaded file, so you can verify that the data was read correctly before proceeding.
6.3 Parameter Selection
The parameters you choose here steer the image analysis job: they identify the columns containing image URLs, the outputs to extract, and the assisting context the model should rely on alongside the images.
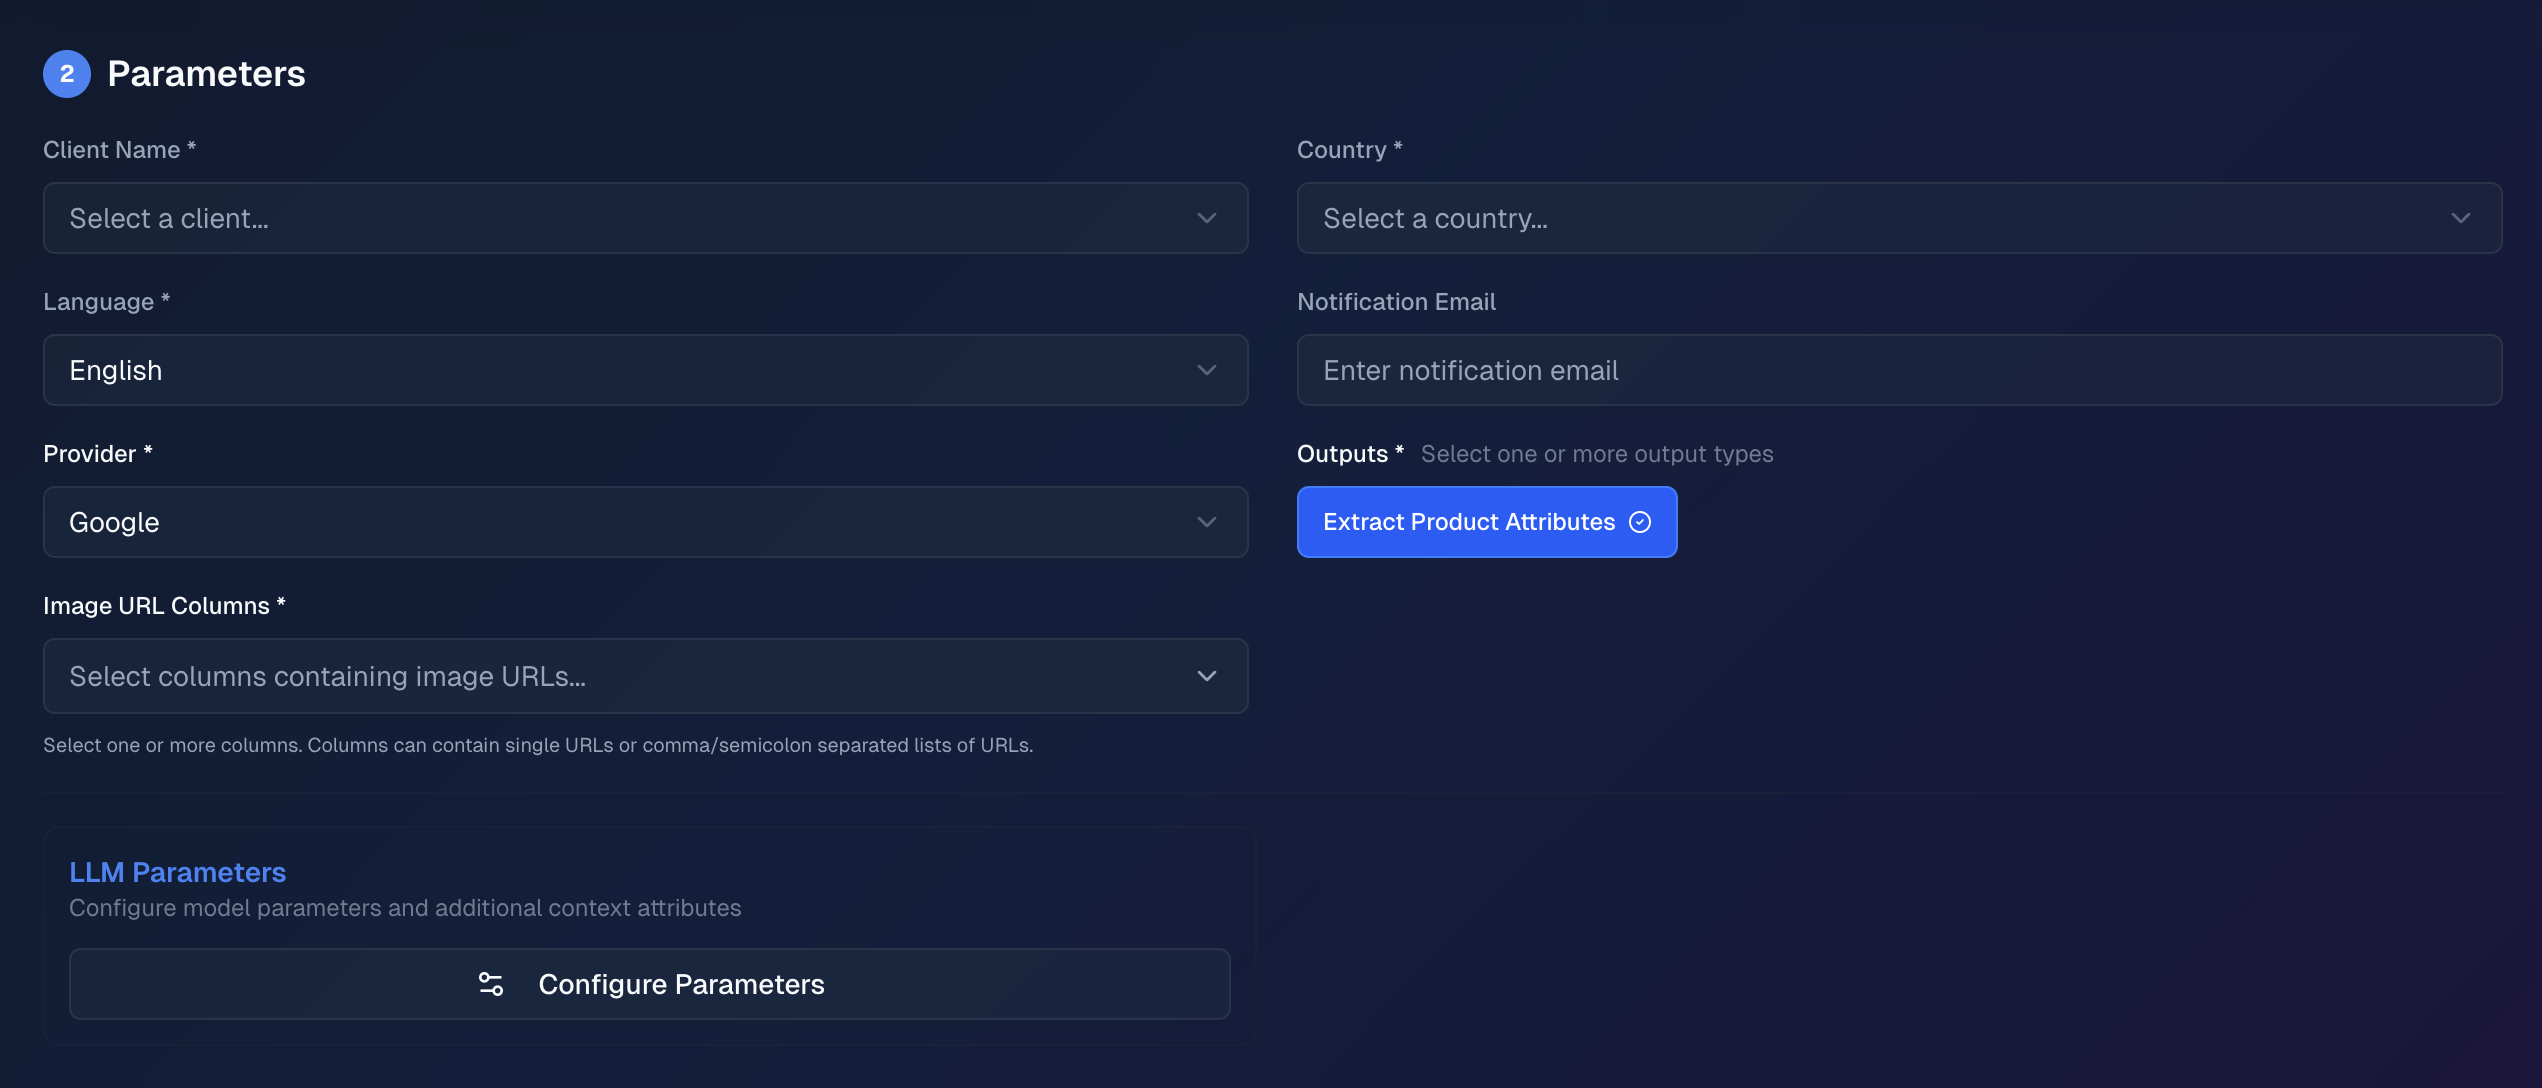
Figure: Parameter selection — client, country, language, notification email, provider, outputs, image URL columns, and LLM Parameters.
1. Client
Adding the client's name helps the LLM to better tailor its responses, ensuring the generated content is more aligned with the client's specific product or brand.
2. Country
Select the target country for the output to tailor the generated content to align with the specific market.
3. Language
Select the desired language for the output. The available languages are drawn from the application's configuration.
4. Notification Email
Enter the email address where a completion notification should be sent once the task has been processed.
5. Provider
The destination platform where the products will be listed. Currently supports Google Merchant Center.
6. Outputs
Select one or more outputs to generate. Currently the available option is:
- Extract Product Attributes — analyses the supplied images and returns structured product attributes (e.g. colour, material, pattern, style)
This output is selected by default.
7. Image URL Columns (shown when at least one output is selected)
Select one or more columns from your data that contain product image URLs. Columns whose names contain "image" are listed first for convenience. Columns can hold a single URL or multiple URLs separated by commas, semicolons, or newlines — all referenced images for a product are sent to the model together.
8. LLM Parameters
Click Configure Parameters to open the LLM parameter modal and fine-tune the model's behaviour and supply additional context columns. See Section 6.4 for details.
6.4 LLM Parameter Selection
After selecting the general parameters, click Configure Parameters to open the LLM parameters modal. These parameters influence how the model interprets the images and structures the extracted attributes.
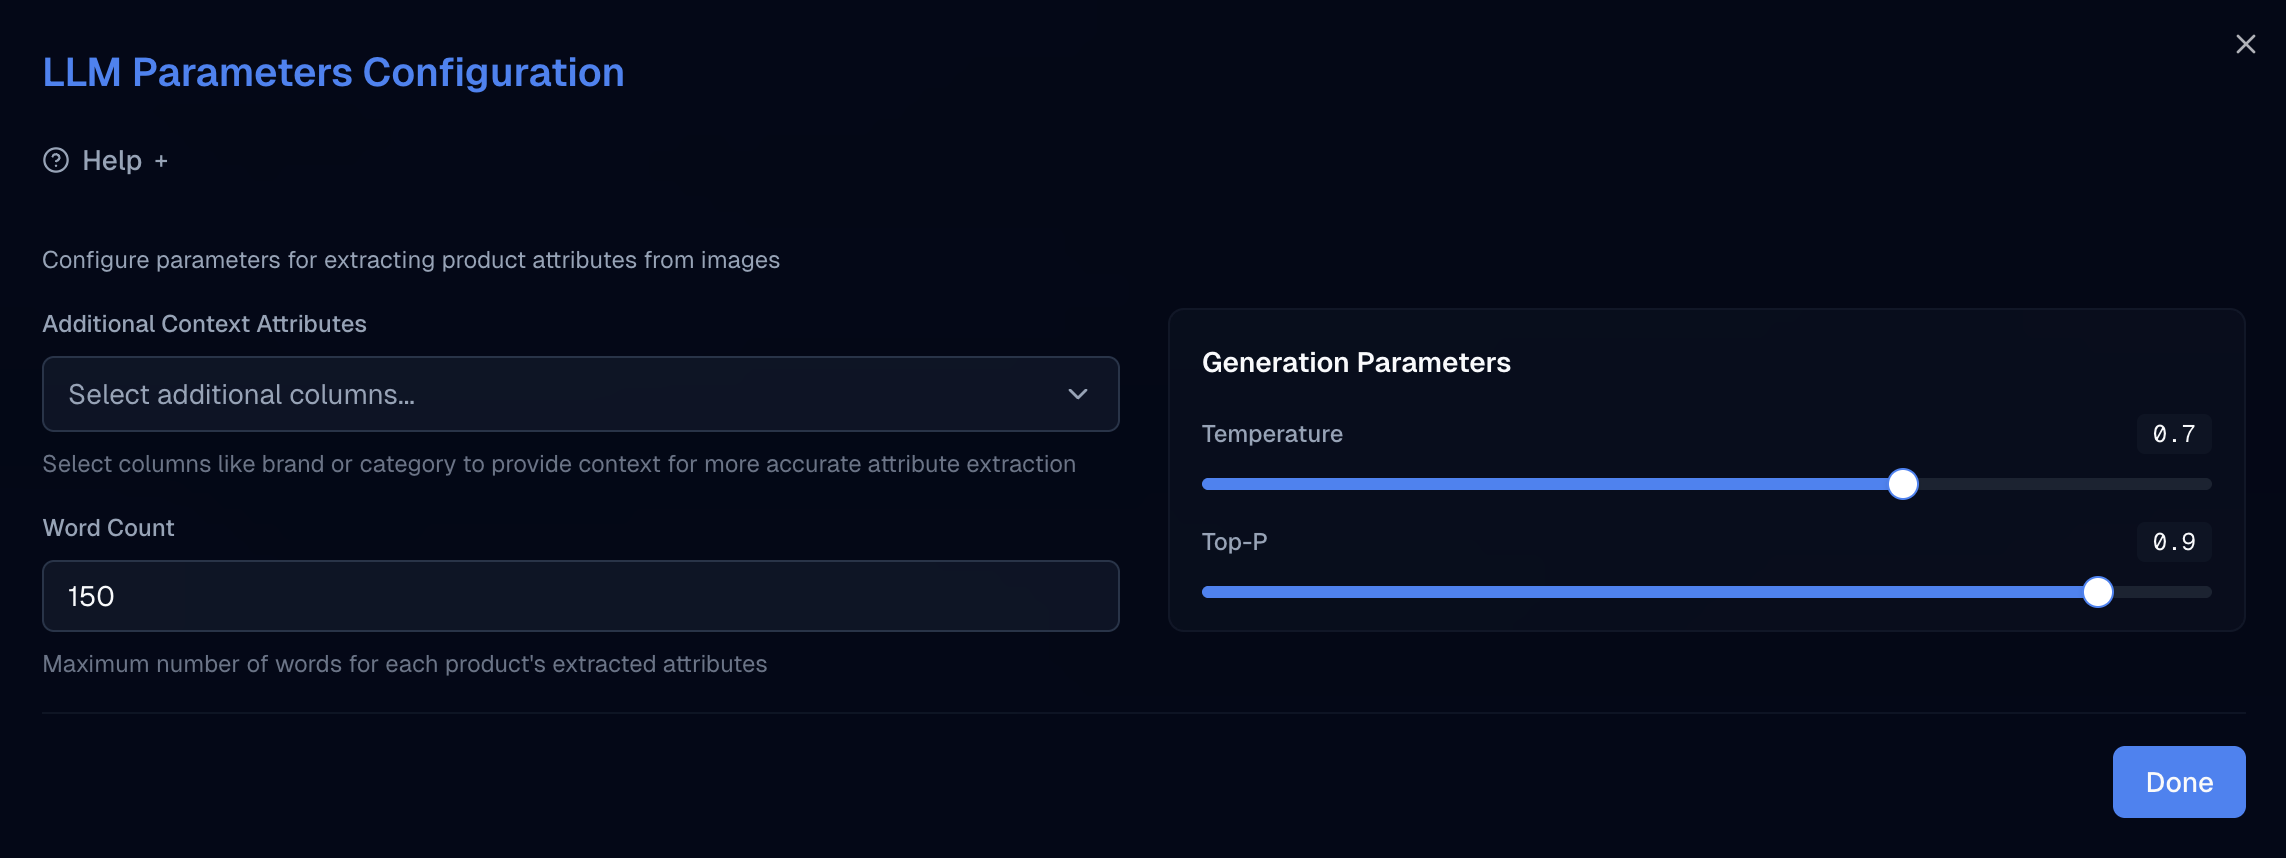
Figure: LLM parameters modal — additional context attributes, word count, and generation parameters.
1. Help
A help section is available at the top of the modal, providing explanations of each parameter.
2. Additional Context Attributes (optional)
Select one or more columns from your data (e.g. brand, category, product title) to provide additional context to the model alongside the images. This helps the model produce more accurate and contextually relevant attributes. Columns that have already been selected as image URL columns are excluded from this list.
3. Word Count
Specify the approximate maximum number of words to generate for each product's extracted attributes.
4. Temperature
Controls creativity (0–1). A lower value produces less creative, more predictable output; a higher value produces more creative but potentially unconventional output.
5. Top-P
Controls word-choice probability (0–1). Lower values restrict the model's word choices to the most probable options, producing more conservative output.
6.5 Submitting the Task
Figure: Submit Task step on Image Analysis — optional File label and Submit to Processing Queue.
1. File label (optional)
Enter a label to help you recognise this run later. The label is shown in the success dialog after submission and appears alongside the filename on the Load Results page.
2. Submit to Processing Queue
Click to submit the task. A task summary dialog will appear for review before final confirmation. After confirming, the task is queued for processing and you will receive an email notification at the address provided when the output is ready.
VII. Load Results
7.1 About Loading Results
This page lists processed outputs from the AI model so you can filter and download reports from previous submissions. Filter options include country, language, notification email, filename, and a start/end date range. Summary counts (Available Files and Unique Clients) appear alongside the filters when a client is selected.
Note: Only reports accessible to your active user group are returned. If you do not see expected results, verify your active group and client selection.
7.2 Viewing and Downloading Results
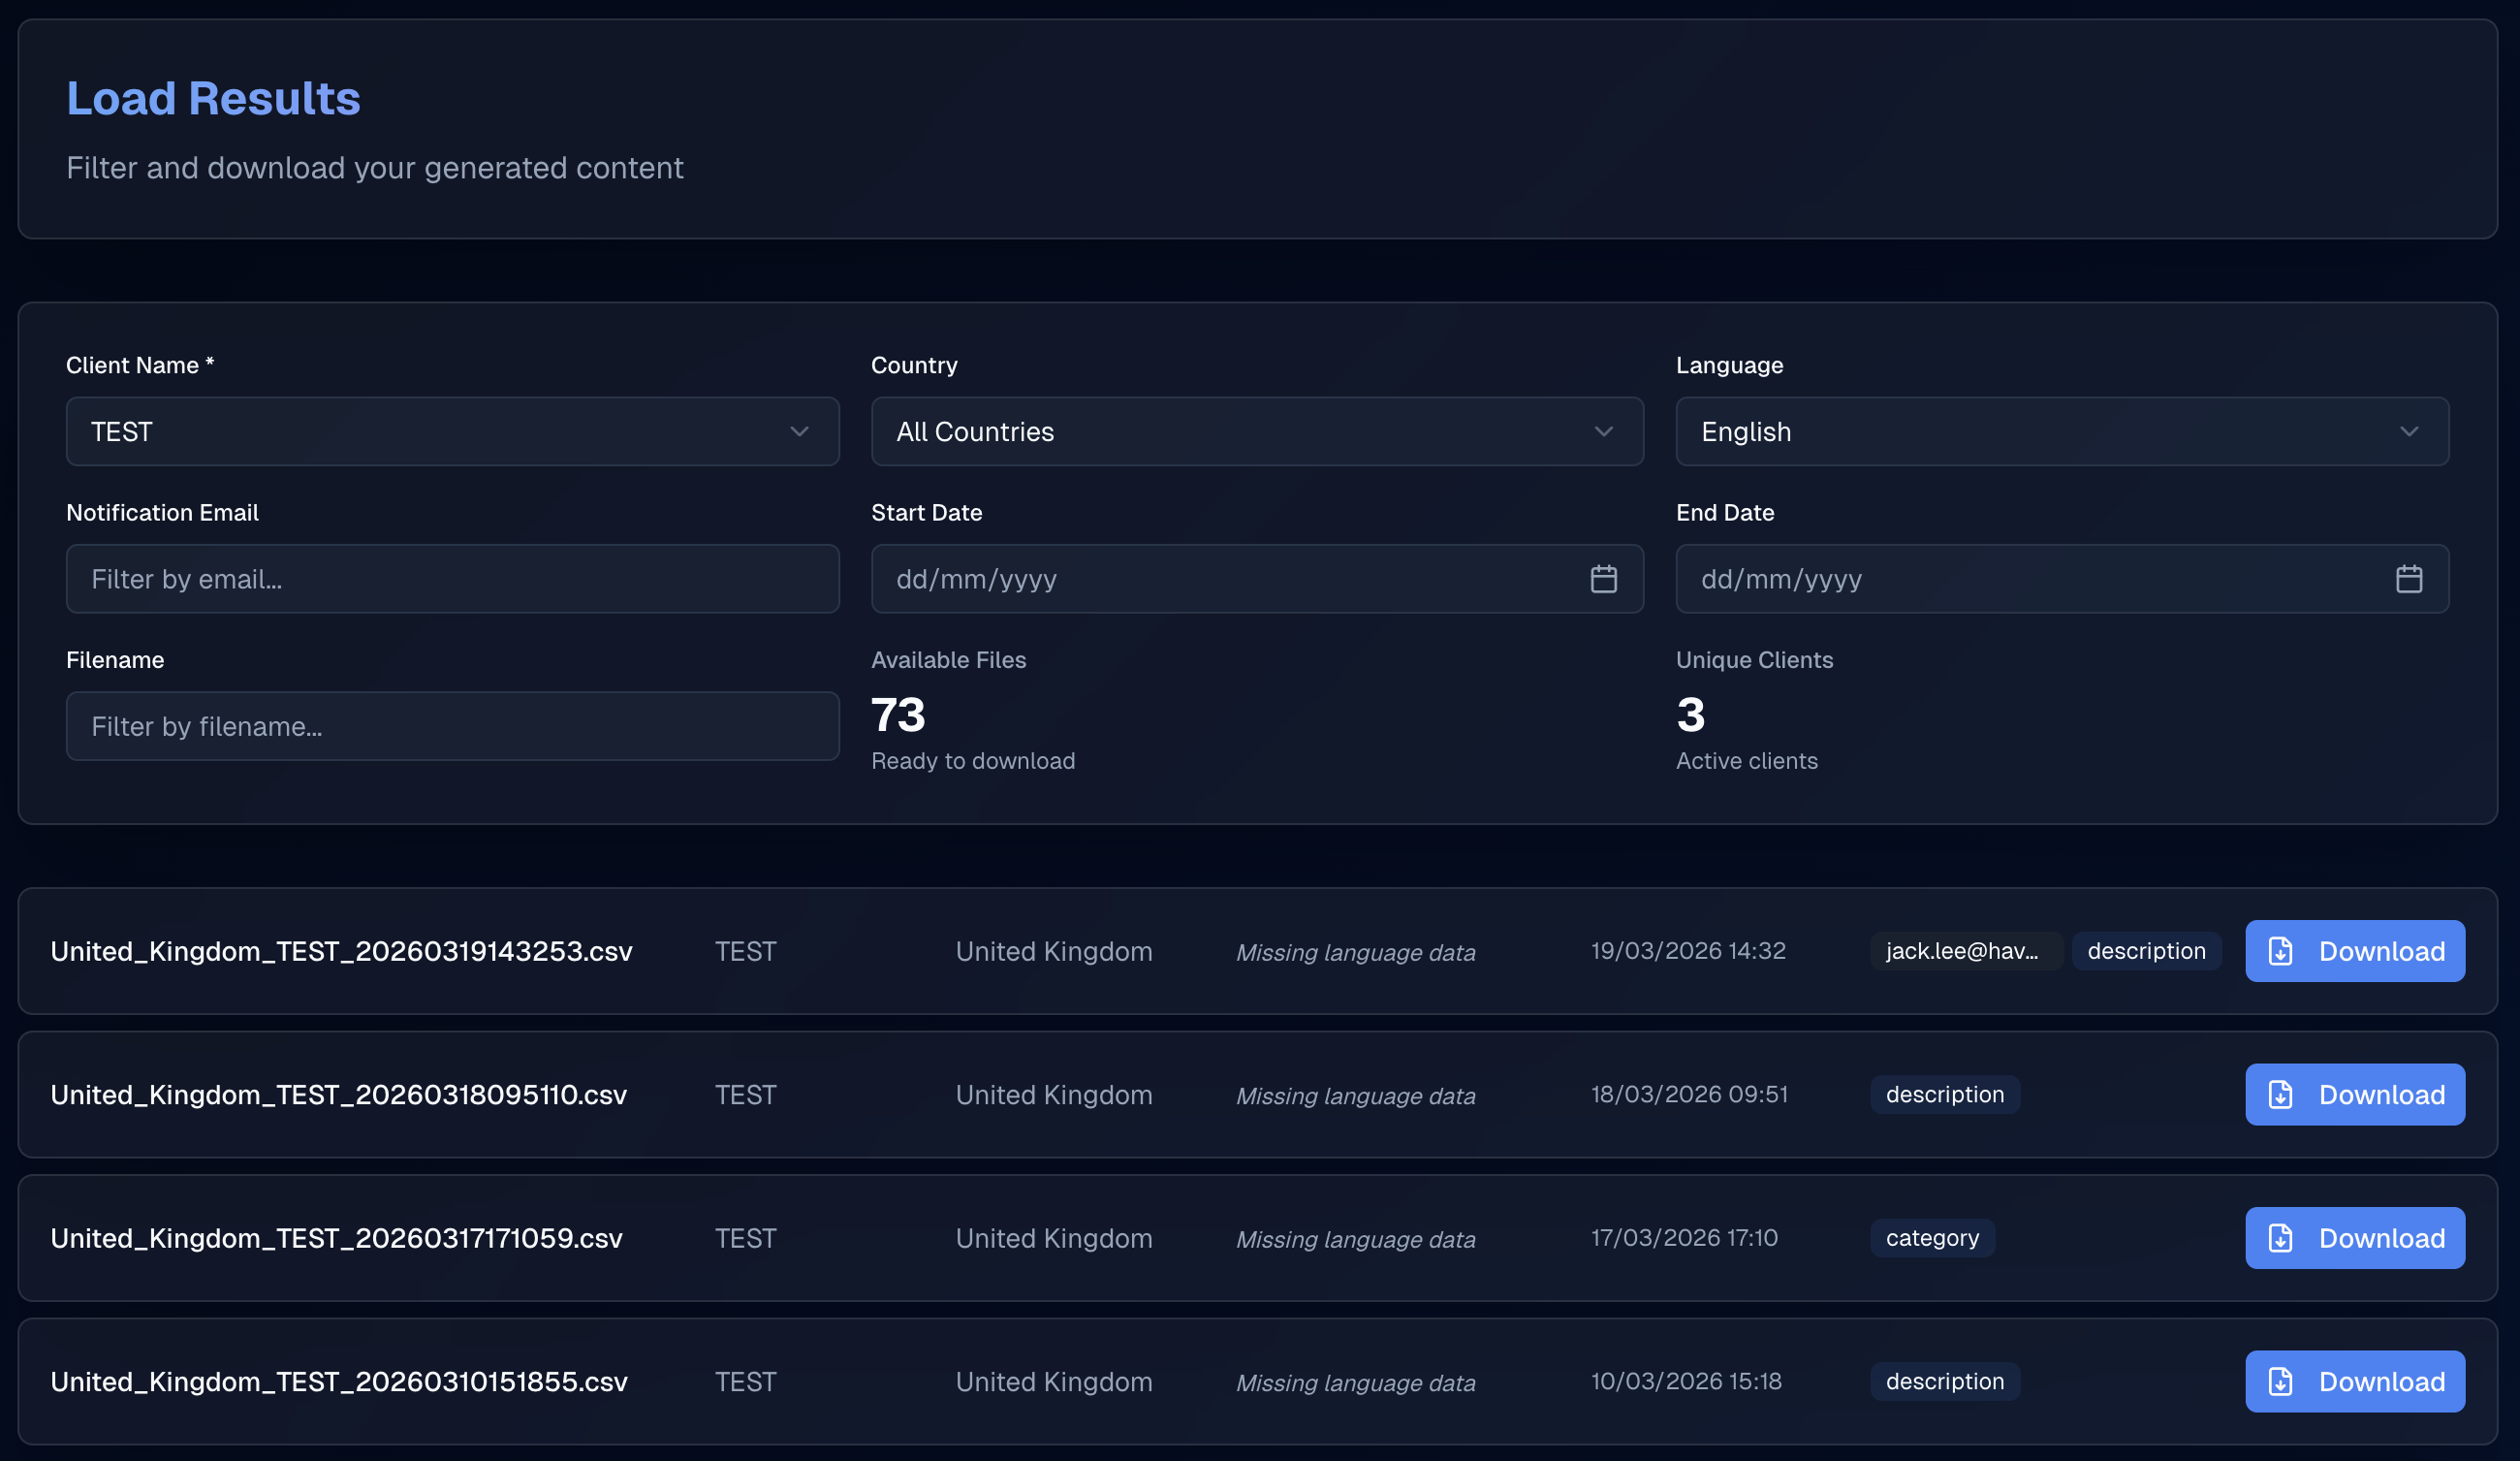
Figure: Filter by client, country, language, notification email, filename, and date range; inline counts; download from each report row.
1. Client Name (required)
Enter the client name to filter results. Results matching the entered client name will be returned.
2. Country
Select a country from the dropdown to filter results to a specific market.
3. Language
Select a language from the dropdown to filter results to a specific language.
4. Notification Email
Enter an email address to filter results by the notification email used when the task was submitted.
5. Start Date and End Date
Set a Start Date and End Date to restrict results to tasks submitted within a specific time window.
6. Filename
Optional. Enter text to filter by the original output filename.
Inline statistics
When a client is selected, the page shows Available Files (number of matching reports) and Unique Clients (distinct client values in the result set).
Results list
Matching reports appear as rows (cards). Each row typically shows:
- Filename
- Client
- Country
- Language
- Submission timestamp
- Tags for notification email addresses and task types
Click the Download button on a card to download the corresponding output CSV. The generated columns in the output file have a suffix of _output added to their names, making it easy to distinguish them from the original data.
If no reports match your filters, adjust the criteria or create new output using the other tools first.